Updated February 2025: Stop getting error messages and slow down your system with our optimization tool. Get it now at this link
- Download and install the repair tool here.
- Let it scan your computer.
- The tool will then repair your computer.
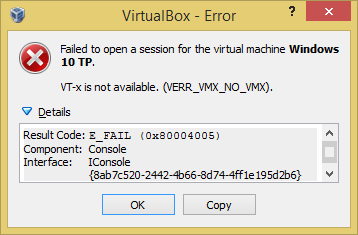
Sometimes you may get the message “VT-x is not available”. (VERR_VMX_NO_VMX) “Error on attempt to run x64-bit virtual machine in VirtualBox.

Failed to log into Windows 10 TP Virtual Machine.
VT-x is unavailable. (VERR_VMX_NO_VMX).
Result code: E_FAIL (0x80004005).
Component: console
Interface: IConsole {8ab7c520-2442-4b66-8d74-4ff1e195d2b6}.
There are three most common reasons for this error:
- Your CPU does not support VT-x or AMD-V virtualization.
- VT-x or AMD-V are not included in BIOS (UEFI).
- You have enabled Hyper-V virtualization in Windows
The only way to fix the first bug is to replace the processor with a new one. However, the second and third causes are easy to fix.
Disable Hyper-V virtualization

Since this is one of the most common scenarios, let us first make sure that Hyper-V virtualization does not affect VT-x. When you enable Hyper-V virtualization, the virtualization equivalent of VT-x will automatically shut down.
February 2025 Update:
You can now prevent PC problems by using this tool, such as protecting you against file loss and malware. Additionally, it is a great way to optimize your computer for maximum performance. The program fixes common errors that might occur on Windows systems with ease - no need for hours of troubleshooting when you have the perfect solution at your fingertips:
- Step 1 : Download PC Repair & Optimizer Tool (Windows 10, 8, 7, XP, Vista – Microsoft Gold Certified).
- Step 2 : Click “Start Scan” to find Windows registry issues that could be causing PC problems.
- Step 3 : Click “Repair All” to fix all issues.
You may have solved this problem after installing an application such as Docker. Note that in most cases, even if you uninstall an application that has enabled Hyper-V, the technology will remain enabled without allowing VT-x to run.
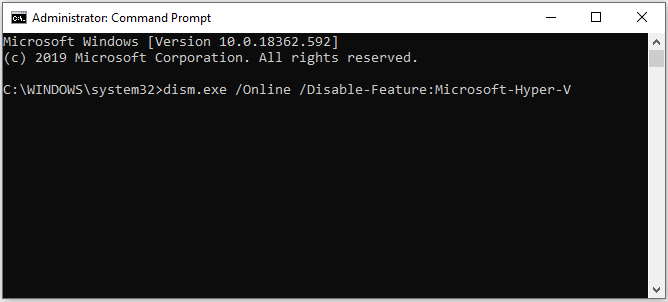
Test this scenario by disabling Microsoft Hyper V. There are several ways to disable Hyper-V virtualization. However, let us try to make it as easy as possible. To disable Microsoft Hyper V from the command line with advanced privileges:
- Click on Windows Key + R to open the Run dialog box. Then type “cmd” and press Ctrl + Shift + Enter to open a command line with elevated privileges. Click Yes when prompted in the User Account Control (UAC) window.
- On the command line with elevated privileges, insert the following command to disable Microsoft Hyper V and press Enter:
- DISM.exe / Online / Disable the function: Microsoft Hyper-V
- Press ENTER key
- Disable bcdedit / hypervisorlaunchtype
- Press ENTER key
- If the command is successful, close the command line with elevated privileges and reboot the computer.
- On the next boot, open the Virtualbox machine again and see if you get the same error message.
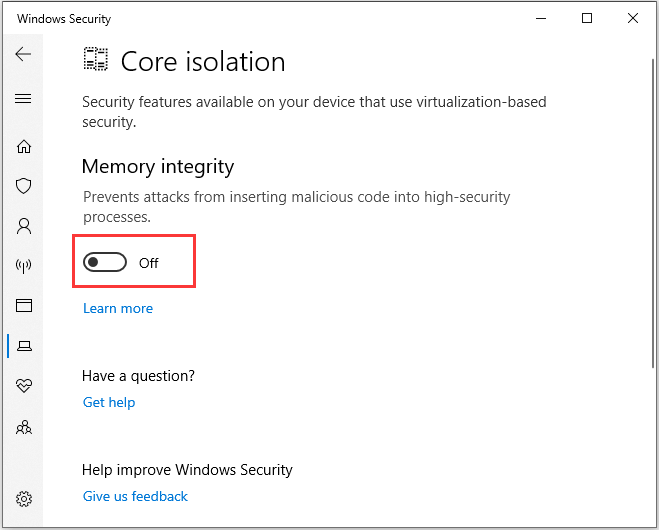
Disable Core Isolation in Windows Defender

To fix the error verr_vmx_no vmx vt x, you can also disable the main Windows Protector isolation.
- Simultaneously press the Windows and I keys to open the settings.
- Select “Update and Security” from the pop-up window to continue.
- Then select Open Windows Security to continue.
- In the right pane, select Device Security to continue.
- From the pop-up window, click Kernel Insulation Information.
- Then set the switch under “Memory Integrity” to “Off”.
Then reboot your computer and check to see if it fixes the error that vt-x is not available.
Enable VT-X in the BIOS settings

If virtualization technology is disabled in the BIOS settings, you may also see an error message that vt-x is not available (verr_vmx_no_vmx). So you can enable vt-x in the BIOS settings.
- Start your computer. When the Windows logo appears, constantly press the “Setup” button to enter the BIOS.
- After entering the BIOS, go to the “Security” tab and scroll down to “System Security”.
- Then check to see if virtualization or VTx / VTd technology is specified here and if it is enabled.
- Otherwise, change the status to on.
After all the steps, reboot your computer to see if the error that vt-x is unavailable (verr_vmx_no_vmx) is corrected.
Expert Tip: This repair tool scans the repositories and replaces corrupt or missing files if none of these methods have worked. It works well in most cases where the problem is due to system corruption. This tool will also optimize your system to maximize performance. It can be downloaded by Clicking Here
