Updated February 2025: Stop getting error messages and slow down your system with our optimization tool. Get it now at this link

Read-only is a file/folder attribute that allows only a specific group of users to modify those files and folders. This feature does not allow others to modify these read-only files/folders without your explicit permission. Depending on your needs, you can leave some files in system mode and others in read-only mode. You can turn this feature on/off at any time.
Unfortunately, several users have reported that their files and folders keep returning to read-only mode after upgrading to Windows 10.
What causes a folder to return to read-only mode in Windows 10?

In general, some folders/files become read-only to protect file integrity. In this case, the problem folder automatically becomes read-only, making it inaccessible for editing.
Windows Update: If we recently upgraded to Windows 10, the account permissions may have been changed. This will cause this error to occur.
Account permissions: Sometimes the error may simply be related to account permissions. This is a common thing that we don’t realize.
How to fix folders that are constantly reset to a read-only mode in Windows 10??
You can now prevent PC problems by using this tool, such as protecting you against file loss and malware. Additionally, it is a great way to optimize your computer for maximum performance. The program fixes common errors that might occur on Windows systems with ease - no need for hours of troubleshooting when you have the perfect solution at your fingertips:February 2025 Update:

Changing the permissions
Many users have reported this problem. Since most of them confirmed that they solved the problem by changing the permissions, we suggest you try this first.
- Locate the C drive, right-click on it and select Properties.
- A new window will appear. Click on the Security tab.
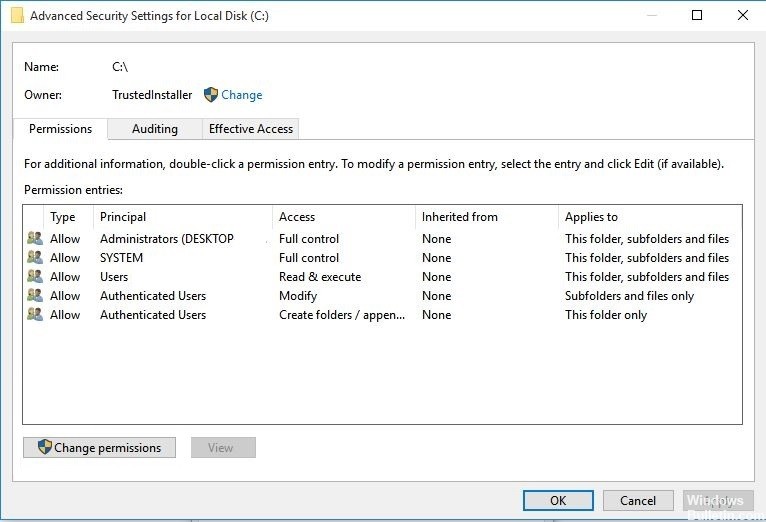
- Click the Advanced button in the bottom right corner. Then click on Change Permissions.
- Select the user you’re interested in and click Edit.
- In the drop-down menu under Apply to select this folder, subfolders, and files.
- Under Basic permissions, select Full Control, then click OK.
If you have more than one user on your computer, follow these steps:
- Locate the C drive and double-click it.
- You will see the Users folder. Double-click it.
- You should now see the Users folder. Right-click on it and select Properties.
- Go to the Security tab and click the Advanced button in the lower right corner.
- In the new window, you should see the Enable Inheritance button in the lower-left corner. Click on it.
- After changing the permissions, the problem should go away.
Editing Attributes
If a certain folder has a read-only attribute, the program cannot save files or make changes to them. Change the “Read-only” attribute in the System using the Attrib command in cmd.
- Type cmd in the Windows search bar. Right-click the result and select Run as administrator.
- To remove the read-only attrib and set the system attrib, type the following command
attrib -r +s drive:(path)(folder name). - Configure the folders, as some programs may not work correctly with folders that have these attributes. To remove them, type
attrib -r -s c:(folder name)
Keep in mind that removing a read-only attribute or a system attribute from a folder may result in some loss of configuration, but this is not particularly important unless you have something specific in mind.
Performing SFC and DISM scan checks
You can use system file checks to recover corrupt files on your system.
- Press the Windows+R key.
- Then type “cmd” and press Enter.
- To perform an SFC scan, type this command and press Enter to perform a simple SFC scan.
sfc /scannow - Running a DISM scan is a very simple process. To do this, copy the following commands one after another, then press Enter.
DISM.exe /Online /CleanupScreen /Scanhealth
DISM.exe /Online /CleanupScreen /Health Restore
DISM.exe /Online /CleanupScreen /Start cleaning components - When all these checks are complete, close the terminal and reboot the machine.
Expert Tip: This repair tool scans the repositories and replaces corrupt or missing files if none of these methods have worked. It works well in most cases where the problem is due to system corruption. This tool will also optimize your system to maximize performance. It can be downloaded by Clicking Here
Frequently Asked Questions
How can I prevent a folder from being read-only?
- Open Windows Explorer and navigate to the file you want to change.
- Right-click on the file name and select "Properties".
- Select the "General" tab and uncheck "Read Only" to remove the read-only attribute, or check the box to enable it.
How do I disable the read-only folder in Windows 10?
- Open File Explorer. My favorite way is to press the Win+E key combination.
- Navigate to the folder where the problem occurred.
- Right-click in the empty area and select Properties.
- On the General tab, turn off the Read-Only attribute.
- Now click on the Ok button.
Why can't I remove the read-only attribute in Windows 10?
Go to the Security tab and click the Advanced button. Step 3: In the pop-up window, click the Enable Legacy button. After changing permissions, you can check if the "Can't remove write protection from folders" problem in Windows 10 is resolved or not.
Why is my folder always reset to read-only mode?
If your folder is always reset to read-only mode, it may be due to a recent Windows 10 update. Many users have reported that this error occurred after upgrading to Windows 10. Read-only is a file/folder attribute that allows only a certain group of users to read or modify a file or folder.
