Updated February 2025: Stop getting error messages and slow down your system with our optimization tool. Get it now at this link
- Download and install the repair tool here.
- Let it scan your computer.
- The tool will then repair your computer.
System Restore is a very useful feature of Windows 10, as it allows you to reset your PC to a previous working time in case of a system failure. However, sometimes system restore fails with the error message “System restore did not complete successfully” and you will not be able to restore your PC. But don’t worry, the troubleshooter is there to show you how to fix this error and restore your PC from the system restore point. So, without wasting any time, let’s see how you can actually solve the “System Restore Failed” problem using the methods listed below.

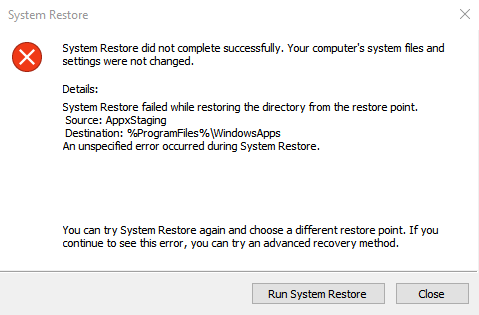
Error Message:
System Restore did not complete successfully. Your computer’s system files and settings were not changed.
Details:
System Restore failed while restoring the directory from the restore point.
Source: AppxStaging
Destination: %ProgramFiles%\WindowsApps
An unspecified error occurred during System Restore.
Select another restore point
The first and simplest solution to correct a system recovery error is to try another recovery point. The recovery point you choose may have been damaged and will prevent you from completing the recovery. Therefore, if you use another recovery point, eliminate this possibility.
To select a different recovery point and complete the system recovery, follow the steps below.
- On the search bar, type System Restore and, in the list of results that appears, click Create Restore Point.
- In the System Properties window, click the System Protection tab and select the Restore System button.
- A series of restore points are displayed. Select the most recent point and click Next to complete the restore process.
- Ideally, this should resolve the “System Restore failed” error. If it does not and you see an error message again, please proceed to the next step.
Check the system protection settings

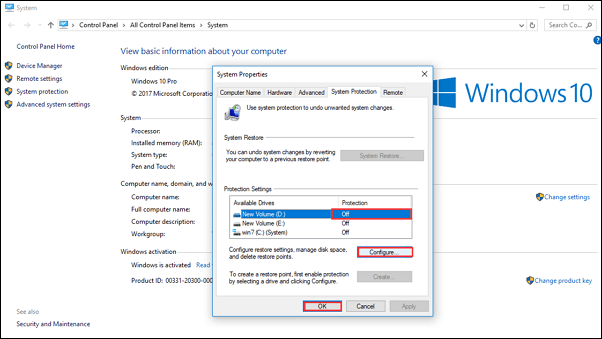
System restoration failed and was not completed successfully The error sometimes occurs because the system protection settings are corrupted. Please check whether the system protection settings are correct.
- Start up in Windows, click “Start”.
Right-click “Computer”, click “Properties” > “System Protection”. - Make sure that the value in the “Protection” column is set to “On” on your hard drive If the value in the “Protection” column is set to “Off”, select the hard drive and click “Configure”.
February 2025 Update:
You can now prevent PC problems by using this tool, such as protecting you against file loss and malware. Additionally, it is a great way to optimize your computer for maximum performance. The program fixes common errors that might occur on Windows systems with ease - no need for hours of troubleshooting when you have the perfect solution at your fingertips:
- Step 1 : Download PC Repair & Optimizer Tool (Windows 10, 8, 7, XP, Vista – Microsoft Gold Certified).
- Step 2 : Click “Start Scan” to find Windows registry issues that could be causing PC problems.
- Step 3 : Click “Repair All” to fix all issues.
Performing System Restore in Safe Mode
According to some users, running the system restore from safe mode is a possible way around the “System restore did not complete successfully” error.
- Restart your computer and press the F8 key before the Windows logo appears.
- Select “Safe Mode” and press the Enter key.
- Once Windows has finished loading, open System Restore and follow the steps in the wizard to continue.
Rename the WindowsApps folder in Safe Mode

Then, there is another way to resolve the system recovery error 0x80070091, which is to rename the WindowsApps folder in Safe Mode. In the meantime, you should start your Windows 10 in safe mode with this solution.
- Open the “Run” program by pressing the “Windows” + “R” keys.
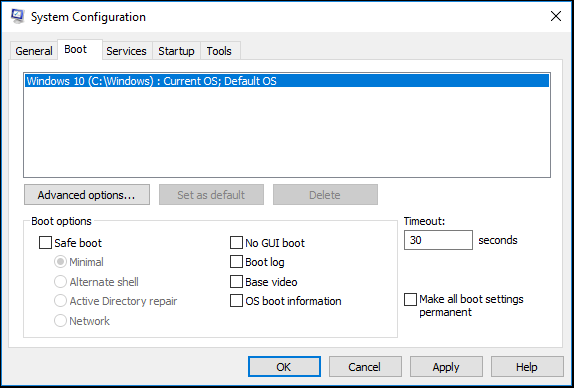
- Type “msconfig” in the search field and click “OK” to continue.
- In the pop-up window, you must display the start window and check “Safe boot” and click “Apply”. Then click “OK” to continue.
- In the pop-up window, you can click “Restart” to start your computer in safe mode.
- Open the command prompt and run the command as an administrator to continue.
- Type the following commands step by step, and press the Enter key after each command.
- cd C:\Program Files
- takeown /f WindowsApps /r /d Y
- icacls WindowsApps /grant “%USERDOMAIN%\%USERNAME%”:(F) /t
- attrib WindowsApps –h
- rename WindowsApps WindowsApps.old
- After entering the commands, you must repeat steps 1 and 2. Then you must uncheck “Safe boot” and click “Apply”. Then click “OK” to continue.
- After that, restart your Windows 10 to see if the Windows 10 recovery problem is solved.
Expert Tip: This repair tool scans the repositories and replaces corrupt or missing files if none of these methods have worked. It works well in most cases where the problem is due to system corruption. This tool will also optimize your system to maximize performance. It can be downloaded by Clicking Here
