Updated February 2025: Stop getting error messages and slow down your system with our optimization tool. Get it now at this link
- Download and install the repair tool here.
- Let it scan your computer.
- The tool will then repair your computer.
Do you wish to hide some of your personal files from the public in order to ensure better privacy protection? There are many ways to hide your files, but the best way is to hide them inside a .jpg image.

You can hide your files with the default window attribute “Hidden”, but this method is less secure because anyone with basic computer knowledge can access them. To make your files even safer, you can hide them inside a .jpg image and no one should know that you have a file hidden behind the selected .jpg image. Just follow the simple steps below to hide your files in an image.
Since images are read from the header down and zip files from the footer up, you can easily merge them into one file and no one will ever know. Read on to find out how.
How to Hide your Files Inside JPG Image
- To get started, first create a .jpg image or you can even upload an image from the Internet. For this exercise, I will save the image file in the secret folder inside the “F” drive. This means that F:\secret.jpg will be the path to the downloaded image file (secret.jpg is the name of the downloaded image file).
- Now right-click in the empty space inside the secret folder and click New -> WinRAR Archive to create a new archive folder.
- Move the files you want to hide from public view to the Archived folder.
February 2025 Update:
You can now prevent PC problems by using this tool, such as protecting you against file loss and malware. Additionally, it is a great way to optimize your computer for maximum performance. The program fixes common errors that might occur on Windows systems with ease - no need for hours of troubleshooting when you have the perfect solution at your fingertips:
- Step 1 : Download PC Repair & Optimizer Tool (Windows 10, 8, 7, XP, Vista – Microsoft Gold Certified).
- Step 2 : Click “Start Scan” to find Windows registry issues that could be causing PC problems.
- Step 3 : Click “Repair All” to fix all issues.
You can open cmd (command prompt) with:
- Press the Windows Start button and press R.
- Then type cmd and click OK.
- Or, simply search in the search bar for
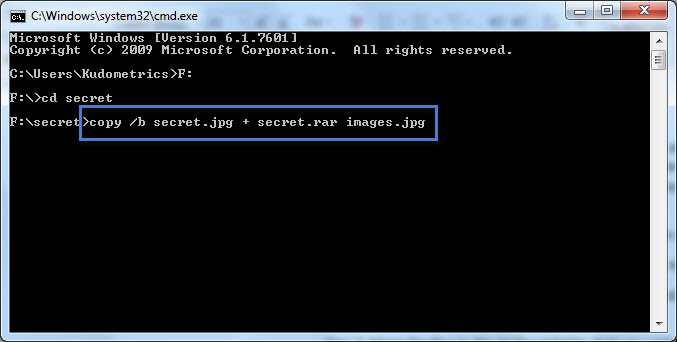
- Now enter the cmd:
- copy /b picturename.jpg + foldername.rar outputfilename.jpg
- If you used zip to archive the file, then enter .zip at the end of your folder name OR if you used RAR, then enter .rar at the end of your folder name.
- Depending on the type of screen you are using, you must enter the name of the enhancement.
- (for example: “jpg” for jpeg images, “png” for portable network graphics, etc.).
- If you are using a jpg image, you must enter jpg at the end of the output file name, and the same for others.

How to Show the Hidden Files
You don’t need to use the command prompt to display the hidden files in a JPG photo.
- To view your files, right-click the JPG image where your files are hidden, select Open with, and select WinRAR Archive.
- You can click the “Extract To” button to extract files from the archive and save them to a folder on your PC.
- Another way to view the files is to change the extension of your JPG image. To do this, right click on your photo, select Rename and change the extension to ZIP.
- You can double-click this renamed ZIP file to extract the hidden files.
Conclusion
That’s all I’m saying. You have now managed to hide your files in a .jpg image. To recover the hidden files, change the extension of the new .jpg image to .rar and double-click the file.
If you encounter any problems while following this tutorial, please let us know in the “Comments” section below.
https://gist.github.com/cianb96/8089653
Expert Tip: This repair tool scans the repositories and replaces corrupt or missing files if none of these methods have worked. It works well in most cases where the problem is due to system corruption. This tool will also optimize your system to maximize performance. It can be downloaded by Clicking Here
