Steampunk is a sub-genre of fantasy and speculative fiction that came into prominence in the 1980s and early 1990s. The term denotes works set in an era or world where steam power is still widely used – usually the 19th century, and often Victorian era England – but with prominent elements of either science fiction or fantasy, such as fictional technological inventions like those found in the works of H. G. Wells and Jules Verne, or real technological developments like the computer occurring at an earlier date. – Courtesy of Wikipedia.
This tutorial is based off of a Photoshop tutorial by JamesZilla from psdtuts+.
What We Need
First let’s go ahead and download all of the images we will be using. There are quite a few so it is probably best to grab them beforehand.
* Man
* Goggles
* Hat
* Hat Ornament
* Compass
* Tap
* Belt
* Brass Tank
* Building
* Chimney
* Cloud
* Cogs
* Moustache
* Paper Texture
Step 1
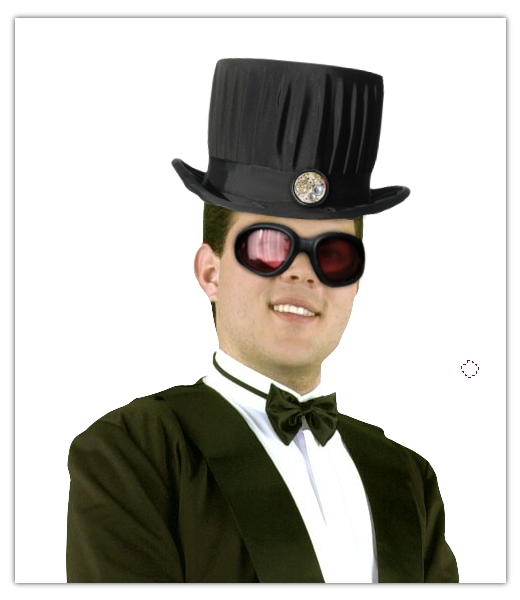
Open up the Gimp and create a new image that is 1600×1200 in size at 300dpi. Go to File > Open as New Layer and select the “man” image. Select > All, copy & paste as a new layer and rename. Do this again with the “goggles” image. Resize the man just a tad bit with the scale tool, similar to the way I have below. Using the lasso, pen, etc tools, cut out the man from the background. Do the same with the goggles layer. Place the goggles over the man’s face and resize them so that they fit, similar to the way I have below. Go to Layer > Transform > Flip Horizontal. Rotate and resize the goggles.
With the goggles layer selected, go to Colors > Hue-Saturation. Raise the Hue to 1 and lower the Saturation to -30. Hit ok.

Step 2
Go to File > Open as Layers and select the hat image. Select > All, copy & paste onto a new layer. Rename the layer as “hat” and delete the original .jpg file. Cut out the hat using either the lasso tool or the pen tool. Rename the layer “hat.” Flip the hat by going to Layer > Transform > Flip Horizontal. Place it on the man’s head. Resize it like I have below. Rotate if necessary.
At this point, the emblem on the front of the hat probably looks a little lopsided. Using a combination of the clone stamp tool and the smudge tool, get rid of the emblem. Start with the clone stamp tool and clone the parts of the hat next to the emblem, covering the emblem, then use the smudge tool to smooth it out. You should have something like mine below.

Step 3
Go to File > Open as Layers and select the hat ornament picture. Select > All, copy & paste. Rename the layer as “hat_ornament” and cut out the ornament. Resize the ornament and place it in the center of our hat like I have below. Go to Filters > Light and Shadow > Drop Shadow. Enter 1 for both X & Y values, 100% for the opacity, and leave the blur radius where it is. Uncheck the “Allow Resizing” box. Hit ok. Merge the “hat_ornament” layer with it’s drop shadow layer. Rename the merged layers as “hat_ornament.”

Step 4
Create a new layer between the “man” and “goggle” layers and name it “face_shadow.” Set the layer mode to Multiply. Use the Color Picker Tool to select dark colors from the man’s skin. Using a soft brush at 25% opacity with the color you selected using the Color Picker Tool, begin to draw a shadow between the goggles and the face. Do this under the hat as well. Bear in mind that the contours of the face against the hat and goggles will produce an uneven shadow.
Step 5
Open the “Moustache” image as a new layer. Select the area around the mouth, moustache, and nose area and copy & paste as a new layer. Rename it as “moustache” and delete the original layer. Go to Layer > Transform> Flip Horizontal to flip the moustache layer. Resize & rotate the layer to fit over the mouth and nose of our original photo. (You can change the layer mode of the moustache layer to Multiply so you can see what you are doing. Change it back afterward.)

Now go to Colors > Hue/Saturation. Adjust the levels so that the moustache better matches the tone of the man. Use a soft eraser and erase the hard edges of the moustache layer.

The color blending is still a little rough. Again with the eraser tool, use a soft brush and, with a lower opacity, further erase some of the edges until the skin blends smoothly. You may want to use the clone stamp tool as well.
Finally, go to Colors > Curves. Play around with the line until the moustache better matches the man’s face.

Step 6
Merge the moustache, man, and face_shadow layers. Rename the merged layers as “man.” Go to Colors > Curves and darken the man a little bit.

Step 7
Now we will create the chest plate that will go on the man. Go to File > Open as Layers and select the compass picture. Select > All, copy & paste onto a new layer and rename the layer “chest_plate.” Render the chest_plate layer using either the lasso tool or the pen tool (however you are comfortable). Select the “man” layer and cut out, copy, & paste the man’s jacket as shown below. Rename the layer as “jacket_cover.”
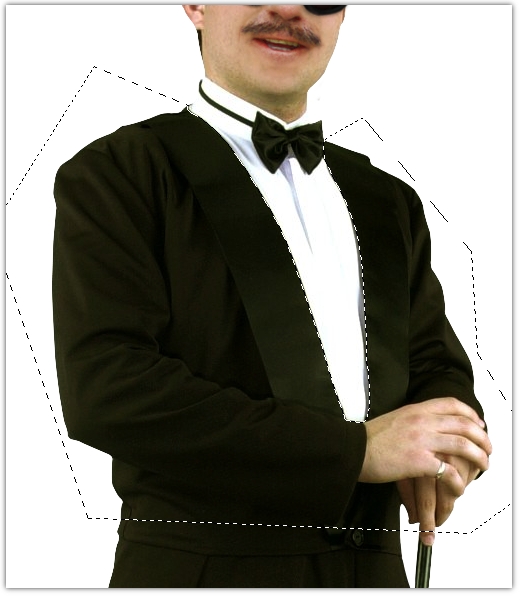
Select the chest_plate layer. Select the area I have below using either the pen tool or the lasso tool. Select > Invert, delete. You should now only have the selection you made left over.

Layer > Transform > Flip Horizontal. Resize it and place it over the man’s chest, under the man_jacket layer. Rotate if necessary. Use the Clone Tool to fill in the areas in which the plate does not reach.

Step 8
Now we need to create the jacket over the plate. Create a new layer between the man_jacket and the chest_plate layer named chest_shadow. Change the layer mode to Multiply and create a shadow as you did in step 4.

Step 9
Now let’s add the valve to the chest plate. Go to File > Open as Layers and select the tap image. Make the image smaller. Select > All, copy & paste onto a new layer. Rename the new layer as “valve” and delete the old one. Cut out the valve and position it over the chest plate like below.
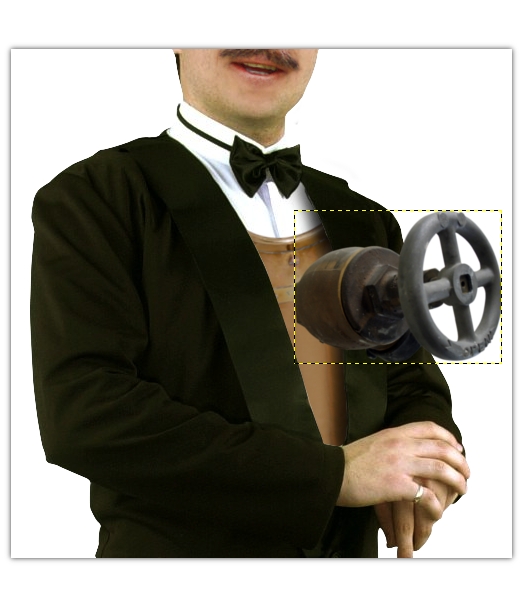
Create a new layer named “valve_shadow.” Set the layer mode to Multiply and create shadows like we did before. Be sure that some of the shadow bleeds over to the jacket as well.

We need to match the shade of the bottom of the valve with it’s shadow where it connects to the chest plate. Select the “valve” layer. Select the Burn tool and burn the valve, darkening it to the shade of the shadow we created.

With the “valve” layer selected, go to Colors > Curves. Play around with the settings until you get the valve to match up with the plate a little better than it currently does.
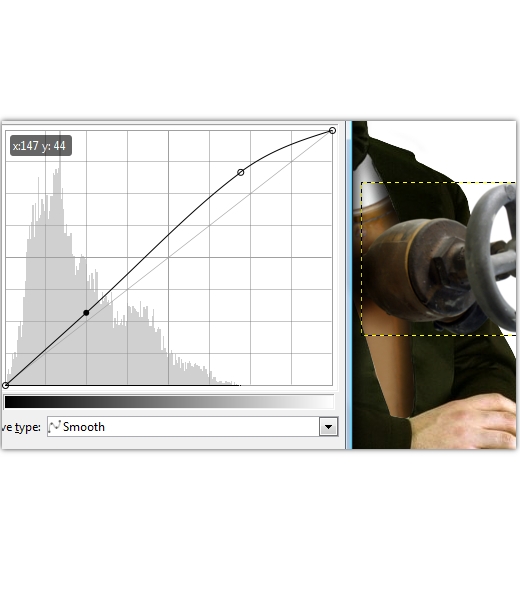
Step 10
Go to File > Open as Layers and open up the belt image. Resize it and then go to Select > All, copy/paste onto a new layer. Rename the layer as belt_left. Duplicate this new layer and name it “belt_right.” Render both of them. Delete the original belt layer.
These next few parts may be a bit difficult. We don’t have a warp feature like Photoshop’s so we are going to have to make the best of what we have. Hide the “belt_right” layer. Select the “belt_left” layer and go to Filters > Distorts > Iwarp. Warp it like shown in the screenshot below. When done, rotate and resize the image and place it like below.

Unhide the “belt_right” layer and go to Filters > Distorts > Iwarp. Warp it like below. When done, rotate and resize the layer and place it like below.

Now we have to make the belts appear 3D. Select the “belt_left” layer. Duplicate it. Hit the right arrowkey once and then hit the up arrowkey once. Duplicate this layer and repeat until the belt looks 3D. When it does, merge all the layers making up the “belt_left” layer. Rename this new layer as “belt_left.” Repeat for the “belt_right” layer.
Select the “belt_left” layer and go to Colors > Levels. Adjust according to the snapshot below. Do the same with the “belt_right” layer.

Let’s make the hands, arms, etc go in front of the belt straps like they should. Get out the paths tool and outline the man’s right arm. Turn the path into a selection. Select the belt_left layer and hit delete. You may need to use the eraser tool instead of the delete button to make the coverup seem more realistic.
Repeat with the belt_right layer except this time make an outline of the valve and whatever else should be covering the belt. Repeat with either the delete button or the eraser tool.

Now let’s give the straps a shadow. Create a new layer underneath the belt layers named “belt_shadows.” Set the layer mode to Multiply and create a shadow like we did before.

Step 11
Go to File > Open as Layers and select the brass tank image. Resize the tank and then select > All, copy/paste as a new layer. Delete the original layer. Rename the new layer as “tank1.” Cut out the tank. Rotate and place the tank behind the man as shown below. With the tank1 layer selected, go to Colors > Curves. Adjust as shown below.

Duplicate the tank1 layer and rename the new layer as tank2. Layer > Transform > Flip Horizontal. Place tank2 on the other side of the man as shown below. Create a new layer above the tanks and name it “tank_shadow.” Set the layer mode to Multiply. Create shadows ON the tanks like before (not under them!).

Step 12
Go to File > Open as Layers and select the Building image. Resize it and go to Select > All, copy/paste as a new layer. Delete the original layer and rename the new layer “building.” Select the Perspective tool and warp the layer like below. You should have something like I have.

Now we need to give the image a sense of depth. To do this, we will blur the background image. Select the “building” layer and go to Filters > Blur > Gaussian Blur. Use the settings shown below.
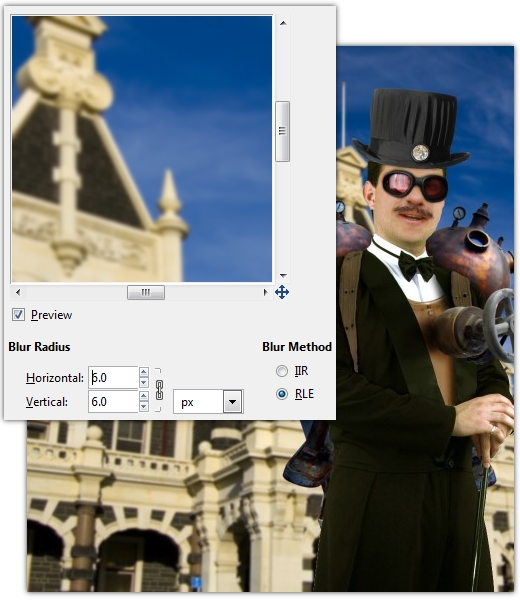
With the “building” layer selected, go to Colors > Hue/Saturation. Lower the Saturation to -48 and hit ok. With the same layer selected, go to Colors > Curves. Manipulate the line like below.

Step 13
Go to File > Open as Layers and select the chimney image. Resize it to make it smaller. Cut out the chimney and duplicate it until you have 3 exhausts. Name them “chimney1,” “chimney2,” and “chimney3.” Position the exhausts similar to what I have below. I have them underneath the layers that make up the brass tanks.

Create a new layer above the exhausts and name it “chimney_shadow.” Set the layer mode to Multiply. We are going to draw shadows on this layer like before except this time we will use the chimney layers to mask of the areas we want to draw on. So for example, if you want to draw a shadow on a chimney, right click it’s layer and select Alpha to Selection, then create the shadow.

Go to File > Open as Layers and select the cloud image. Resize it. Go to Colors > Desaturate and hit ok. Go to Colors > Levels. Adjust as shown below.

Set the Cloud layer mode to Screen. Create duplicates of the cloud layer and position them to appear as if they are coming from the exhausts. Delete areas of the smoke and play around until you have something similar to the image below. You should be able to create the same effect using just the one cloud image.

Step 14
Continue to build up the composition with the appropriate elements. You can use the cogs image to add a neat effect like I have below. Be sure to add a shadow to it like before. As always, name the layers appropriately. You can adjust the hue/saturation as well. I’ve adjusted mine to give the cogs a more brass appearance.

Step 15
Duplicate the largest of your smoke layers. Call this new layer “fog.” Move it to the top of the layers dialog. Resize, rotate, and reposition along the bottom left it so it fogs up the bottom without messing up too much detail. Drop the layer opacity to about 80%. Do this again for the bottom right corner.
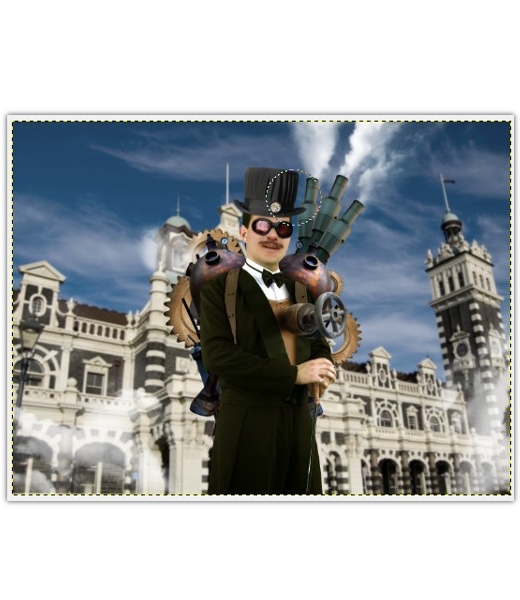
Create a new layer above your fog layers and name it “fog_filler.” Using a large soft brush, paint in bits of steam behind the “FOG” clouds. Mix up the size of the brush from big to small sizes. Vary the amount of times you stamp in one place to achieve different densities within the fog cloud. Be sure to use different opacities as well.

Step 16
Go to Edit > Copy Visible, then go to Edit > Paste As > New Layer. You should now have the complete image on one layer. Call this new layer “flattened.” Duplicate this new layer. Go to Filters > Distorts > Emboss. Use the settings shown below. Set the layer mode to Overlay.

Select the original flattened layer. Go to Colors > Curves. Adjust as shown below.

Go to Colors > Hue/Saturation. Adjust as shown below to lower the saturation.

Create a new layer named “gradient_map1.” Change your foreground color to #22323A and your background color to #738D8F. Select the Blend tool and apply a linear gradient from left to right. Set the layer mode to Color and lower the opacity to 45%.

Step 17
Create a new layer named “highs_lows.” Change your foreground color to #878787 and fill the layer with it using the Bucket Fill tool. Set the layer mode to Overlay. Get out the Burn tool and burn the canvas edges, particularly the sky area. After you finish with that, take a smaller brush and burn in some of the facial areas to add in more depth and boost the darker areas. Use the dodge tool to boost areas which you want to highlight.

Step 18
Duplicate the flattened layer and desaturate it by going to Colors > Desaturate and hit ok. Bring the layer to the top of the layers dialog. Invert it by going to Colors > Invert. Go to Filters > Gaussian Blur. Blur by 15 pixels and hit ok. Adjust the levels by going to Colors > Levels. Set the layer mode to Overlay and lower the opacity to 25%.

Step 19
Now let’s open up the paper texture as a new layer. Resize it a little bit. Place it at the top of the layers. Duplicate it twice. Set the top layer to Burn at 25%. Set the second layer to Color at 30%. Set the third layer to Hard Light at 30%.

Conclusion
And there you have it, somewhat of an introduction to Steampunk. It’s a fun style to work with, and I encourage you to play around with it. So many things can be done with it, it’s just up to you what exactly to do.
