Updated February 2025: Stop getting error messages and slow down your system with our optimization tool. Get it now at this link
- Download and install the repair tool here.
- Let it scan your computer.
- The tool will then repair your computer.
In the age of wireless connectivity and almost unprecedented prices for entry-level printers (but increasingly higher ink prices), some of us will inevitably have more than one device available to print.

Windows 10, in its infinite wisdom, sets your default printer to the last printer used at your current location. This can be distressing for users who tend to print the majority of documents on one type of printer and sometimes use a different printer. While simply switching devices is a simple remedy, some may only want to print on one main device at a time.
If you want to set a default printer and not change it, certain settings must be adjusted to make this possible. Below is an explanation of the procedure for setting a default printer and making sure that it remains the default printer when another machine is used.
February 2025 Update:
You can now prevent PC problems by using this tool, such as protecting you against file loss and malware. Additionally, it is a great way to optimize your computer for maximum performance. The program fixes common errors that might occur on Windows systems with ease - no need for hours of troubleshooting when you have the perfect solution at your fingertips:
- Step 1 : Download PC Repair & Optimizer Tool (Windows 10, 8, 7, XP, Vista – Microsoft Gold Certified).
- Step 2 : Click “Start Scan” to find Windows registry issues that could be causing PC problems.
- Step 3 : Click “Repair All” to fix all issues.
How to Set a Default Printer in Windows 10

- Press the Windows key on your keyboard or click on the Windows icon in the lower left corner of your screen and look for “Printer”.
- Select “Printers and Scanners” from your search results.
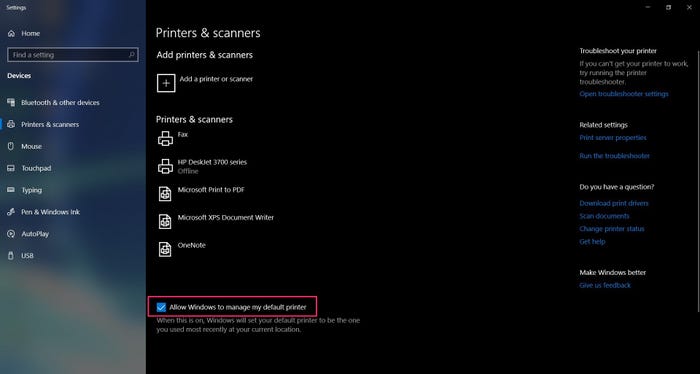
- Uncheck the option “Allow Windows to manage my default printer” at the bottom of the screen by clicking on the checkbox.
- In the list of printers and scanners, select the device you wish to use as your default. Click on it and then click on “Manage”.
- On the new screen, select “Set as Default”. This should now be your default printer.
- To reactivate the default printer settings, check the “Allow Windows to manage my default printer” button again.
How to Set the Default Printer using the Registry Editor

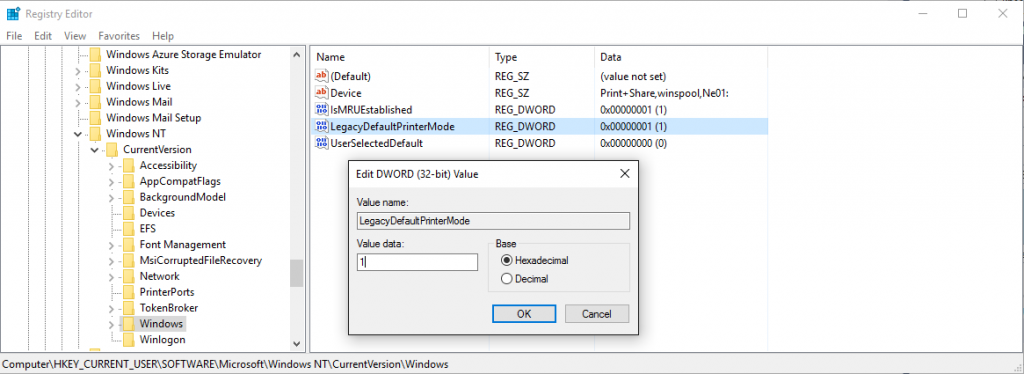
- Open the Registry Editor (right click on Windows Start → run → regedit)
- Navigate to this button:
- HKEY_CURRENT_USER\SOFTWARE\Microsoft\Windows NT\CurrentVersion\Windows
- Set the value “Value data:” for the name “LegacyDefaultPrinterMode” to “1” to return to the old default printer behavior under Windows 10.
Conclusion
However, in some applications it has a drawback. If you are constantly changing printers in the office, the default printer is the last printer used in that location.
I hope this guide has been helpful and that you have been able to set the default printer for Windows 10.
There is no network option to change the default printer as there is in Windows 7, so you should let Windows manage the default printer.
https://www.groovypost.com/howto/manage-default-printers-windows-10/
Expert Tip: This repair tool scans the repositories and replaces corrupt or missing files if none of these methods have worked. It works well in most cases where the problem is due to system corruption. This tool will also optimize your system to maximize performance. It can be downloaded by Clicking Here
