Updated July 2024: Stop getting error messages and slow down your system with our optimization tool. Get it now at this link
- Download and install the repair tool here.
- Let it scan your computer.
- The tool will then repair your computer.
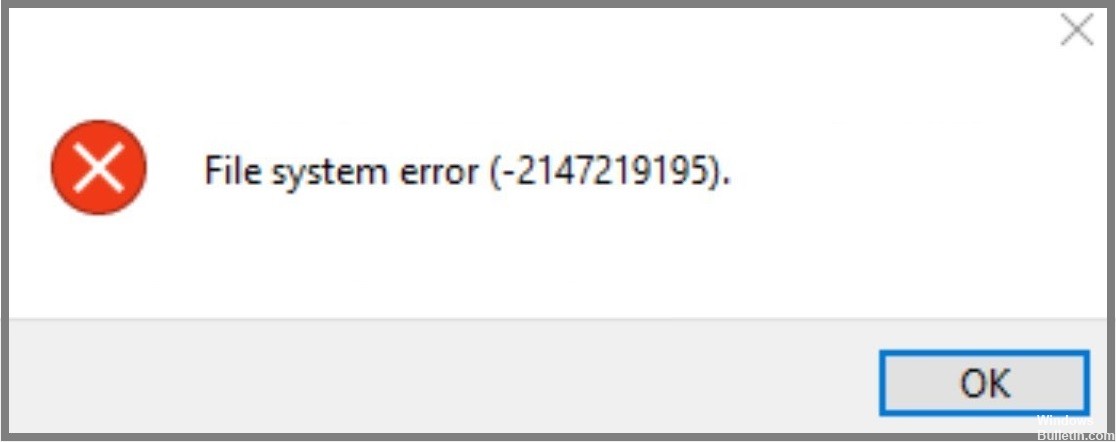
The File System Error (-2147219195) is one of the most common errors found while working with Microsoft Windows operating system. While it might seem like a minor problem, it can cause severe data loss. In fact, it is quite possible that you’ve already experienced this error yourself. If you’re looking for ways to solve this error, here are some tips to help you do just that.
First things first – let’s understand what exactly this error is. A file system error occurs whenever there is a problem in the way files are stored on your computer. When this happens, you’ll receive an error code that indicates the nature of the problem. For example, -2147219195 represents “File System Error”.
Now that we know what this error is, how does it occur? Well, it could happen because of several reasons. One such reason is that your hard disk drive has become corrupted. Another possibility is that you accidentally deleted important files. You can use the Disk Cleanup tool to find out whether your hard disk drive is damaged or not. To do this, follow the steps mentioned below:
- Click the Start button and type “Disk Cleanup” into the Search box.
- Select Disk Cleanup from the list of programs displayed.
- Press Enter to open the program.
- Click OK to begin the process.
- Wait until the cleanup process completes.
- Restart your PC if prompted.
- Check whether the error persists after restarting your PC.
If you still experience the same error, then you should consider getting a new hard disk drive. This will ensure that your PC doesn’t face any problems in the future. However, if you don’t have enough money to buy a new hard disk drive, then you can try other solutions as well. Here are some of them:
Run Windows Updates
Microsoft recommends installing the latest updates for Windows 10, even though some are optional. If you don’t want to install the updates, you can reboot your PC after downloading and installing them. You shouldn’t have to do it often, but sometimes there are issues that require rebooting.
July 2024 Update:
You can now prevent PC problems by using this tool, such as protecting you against file loss and malware. Additionally, it is a great way to optimize your computer for maximum performance. The program fixes common errors that might occur on Windows systems with ease - no need for hours of troubleshooting when you have the perfect solution at your fingertips:
- Step 1 : Download PC Repair & Optimizer Tool (Windows 10, 8, 7, XP, Vista – Microsoft Gold Certified).
- Step 2 : Click “Start Scan” to find Windows registry issues that could be causing PC problems.
- Step 3 : Click “Repair All” to fix all issues.
Use Safe Mode
This method involves booting up your PC using the Safe Mode feature. Once you reach safe mode, you’ll be able to access all the features of your PC without having to worry about the presence of viruses. It’s recommended that you perform this step only when you’re unable to resolve the issue by following the previous methods.
Windows Store Apps Troubleshooter
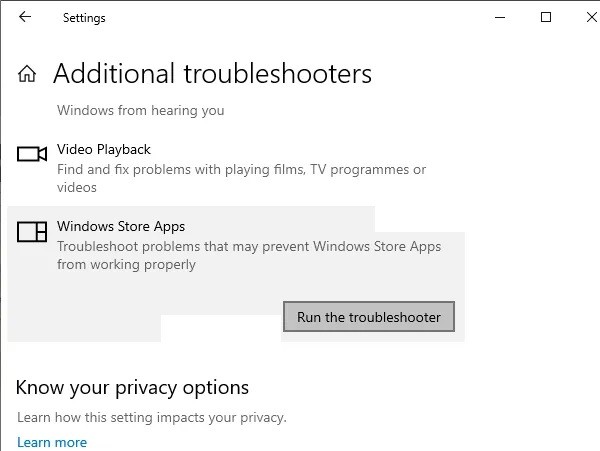
If you are facing issues while trying to run Windows Store apps on your computer, follow the steps mentioned here to fix it.
- Click the Start button and type “troubleshoot”. This opens up the Microsoft store where you can download the latest version of Windows 10.
- Once installed, launch the program and select the “Troubleshoot problems” option.
- After selecting the option, you will see a list of options related to your device. Select the one that suits your issue.
Run System File Checker

- To run sfc / scandisk, press Windows+R keys together, type cmd, and then enter the command prompt.
- Type “scandisk -fixmbr” without quotes.
- Press Enter. This method works best if you’re having problems booting into Windows 10.
Booting in Clean Boot
The photo viewing app has been crashing frequently recently. You’ve tried everything, including uninstalling and reinstalling the app, but nothing seems to work. After some research, it appears there could be a few reasons why the app keeps crashing.
To fix the issue, you’ll need to find out what’s causing the crash and how to stop it. Here’s a quick guide to help you do just that.
- First, make sure you have all the necessary drivers installed. The photo viewer might not function properly if you don’t have the right ones installed.
- Next, check whether the photo viewer crashes when you open a specific folder. It may be possible that the folder contains corrupt files. In this case, you’ll need to delete the folder entirely.
- Finally, you can also try disabling the Photo Viewer service. To do so, click the Start menu and search for services. Find the Photo Viewer service under the Services category. Right-click it and choose Disable. You can now start using the photo viewer again.
Update The Photos Application
You’ve updated the photos application several times, but it hasn’t helped. Maybe you’ve missed something? Try updating the photos application once more.
- Select Allow from the dropdown menu.
- Enter your password and tap OK.
- Now go back to the Photos app and update it.
Restart Your Computer
Sometimes, restarting your computer is enough to solve most of the issues. However, if the problem persists, you should consider doing so. Restarting your PC will clear any temporary files that might cause errors.
Note: If you’re experiencing frequent restarts, you might want to consider installing antivirus software.
Expert Tip: This repair tool scans the repositories and replaces corrupt or missing files if none of these methods have worked. It works well in most cases where the problem is due to system corruption. This tool will also optimize your system to maximize performance. It can be downloaded by Clicking Here
Frequently Asked Questions
What is a file system error?
A file system error is a common type of Windows error that typically occurs because of a corrupted file or malfunctioning program. This type of error causes problems with your computer’s ability to read and write data to the hard drive.
While disk errors are widespread and vary widely in damage and cause, one of the most commonly seen issues is a corrupt file or a malfunctioning application. When either of these things happens, it can prevent your OS from being able to access or use a specific file or piece of code inside your PC.
What causes the file system error 2147219195 on Windows 10?
The most common cause for the error message "File system error -2147219195" is an issue with the Photos app which is built in into Windows 10. This usually occurs because there is a problem with one of the files being opened. A second potential cause is that the file has become corrupted.
How to fix file system error (-2147219195)?
The File System Error (-2147219195) error occurs due to corrupted registry entries. This issue is caused because of malware infection, improper shutdown, virus attack, system crash, etc. To fix this problem, follow the steps given below.
- Restart your computer.
- Press Win+R keys together and type regedit into the Run box.
- Click OK to open Registry Editor.
- Navigate to HKEY_LOCAL_MACHINE\SYSTEM\CurrentControlSet\Services\Netlogon.
- Right-click on Netlogon and select the Delete key.
- Close Registry Editor.
- Restart your computer and see if the error message disappears.
