Updated February 2025: Stop getting error messages and slow down your system with our optimization tool. Get it now at this link
- Download and install the repair tool here.
- Let it scan your computer.
- The tool will then repair your computer.
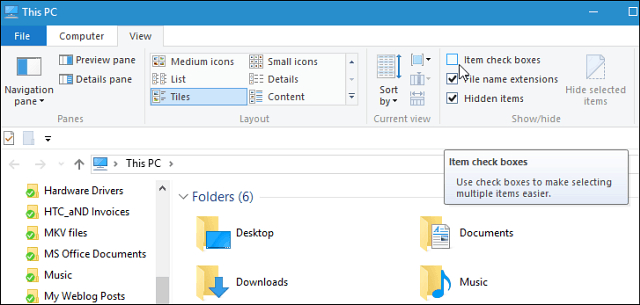
One day you turn on your computer and suddenly the icons have a checkbox when you move the mouse pointer over them. At first you don’t mind because you think it’s something new, but after a while you don’t want it anymore.
If Windows is well configured, using your computer can be more comfortable. Finding configuration options to set up Windows the way you want it or to repair a changed setting can be frustrating. So, if you have checked the icon boxes in File Explorer, how can you turn them off?
Here’s a quick and easy way to remove the icons with checkboxes in them.
To remove checkbook icons in Windows 10 using Explorer

- Start by opening a file explorer window from your taskbar.
- Select any folder in your file explorer by clicking on it once, then select File from the top menu and options from the drop-down list. Note: If the options are not listed, it means that you forgot to select a folder first.
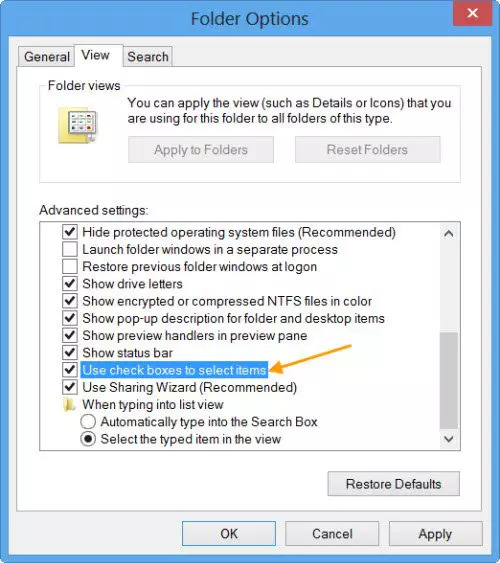
- This opens the folder options window. Select the View tab. In the Advanced Settings: section, scroll down to the Use check box to select items and uncheck the box. Finally, click the “Apply to Folder” button located in the Folder Views section.
- That’s it – they’re gone – no more checkboxes!
Remove the checkboxes to select items using the Registry Editor
- Open the registry editor and navigate to the following location :
- HKEY_CURRENT_USER\SOFTWARE\Microsoft\Windows\CurrentVersion\Explorer\Advanced
- Double-click on the DWORD AutoCheckSelect in the right panel to edit it.
- Set it to 1 to activate it by using the check boxes to select items. Otherwise, set it to 0 (this is the default setting).
- Log out or restart your computer to apply the changes.
February 2025 Update:
You can now prevent PC problems by using this tool, such as protecting you against file loss and malware. Additionally, it is a great way to optimize your computer for maximum performance. The program fixes common errors that might occur on Windows systems with ease - no need for hours of troubleshooting when you have the perfect solution at your fingertips:
- Step 1 : Download PC Repair & Optimizer Tool (Windows 10, 8, 7, XP, Vista – Microsoft Gold Certified).
- Step 2 : Click “Start Scan” to find Windows registry issues that could be causing PC problems.
- Step 3 : Click “Repair All” to fix all issues.
Clear the checkboxes using the Folder Options

You can disable or enable these checkboxes as you wish. To do this, go to Start Windows 10/8/7 Search and enter the folder options. Click the search results to open them.
- On the View tab, scroll to the end of Advanced Settings.
- Here you will see a setting Use checkboxes to select items. Check or uncheck the corresponding box and click Apply/OK.
- You will not see the checkboxes disappear if you choose not to display them.
Expert Tip: This repair tool scans the repositories and replaces corrupt or missing files if none of these methods have worked. It works well in most cases where the problem is due to system corruption. This tool will also optimize your system to maximize performance. It can be downloaded by Clicking Here
