Updated February 2025: Stop getting error messages and slow down your system with our optimization tool. Get it now at this link
- Download and install the repair tool here.
- Let it scan your computer.
- The tool will then repair your computer.
Windows system protection can take up to 10% or more disk space to back up system restore points and older versions. In addition to changing the System Protection disk usage limit to reduce the amount allocated and free up disk space, you can immediately delete and recover almost all of the disk space used by System Restore and hidden copies (including previous versions) by using the Disk Cleanup Manager to eliminate everything but the last system recovery point.

If you make good use of the system’s recovery function under Windows, you will find that all recovery points take up a lot of disk space on your hard disk. The good thing is that you can easily delete system recovery points if necessary to recover lost disk space.
Delete all but the last restore point of the system

- Click on Start, type Cleanmgr.exe, then press ENTER.
- Select the drive letter from the list and click OK.
- Click on Clean System Files.
- This restarts Disk Cleaning to run in Advanced mode.
- Select the drive letter from the list and click OK.
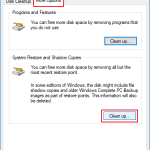
- click on the Other options tab.
- click on the Clean…….. button under System Recovery and Shaded Copies.
- click on OK.
February 2025 Update:
You can now prevent PC problems by using this tool, such as protecting you against file loss and malware. Additionally, it is a great way to optimize your computer for maximum performance. The program fixes common errors that might occur on Windows systems with ease - no need for hours of troubleshooting when you have the perfect solution at your fingertips:
- Step 1 : Download PC Repair & Optimizer Tool (Windows 10, 8, 7, XP, Vista – Microsoft Gold Certified).
- Step 2 : Click “Start Scan” to find Windows registry issues that could be causing PC problems.
- Step 3 : Click “Repair All” to fix all issues.
Delete all restore points in Windows 10

To delete individual restore points, read the instructions in method 3 of this article.
Step 1: Type Sysdm.cpl in the Start/Task Bar search box, then press Enter to open the System Properties dialog box.
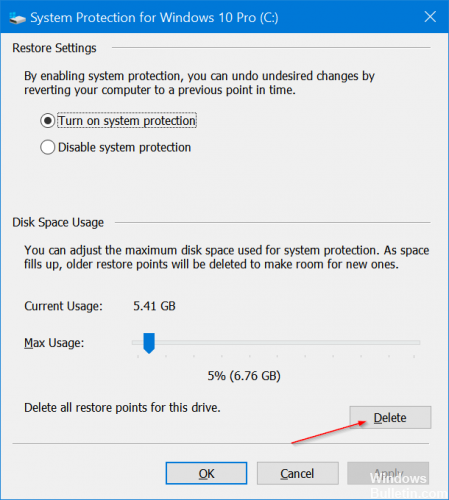
Step 2: Go to the System Protection tab. In the Protection Settings section, select a drive, then click the Configure button. Please note that the recovery point function is separate for all drives on your PC.
Step 3: Finally, in the Disk Usage section, click on the Delete button. Click the Continue button when the warning dialog box appears to continue to delete all recovery points on the selected disk.
To delete the recovery points from all disks, repeat steps 2 and 3.
Delete one or more restore points using PowerShell

Advanced users may want to delete one or more items from PowerShell or the command prompt. We will only discuss this method so that all those who are looking for orders will have them.
Open the command prompt or PowerShell as administrator and type the shadows of the vssadmin list. Each line you see with Shadow Copy ID: is a restore point.
So to delete one or more of these restore points, you must type vssadmin delete shadows /Shadow= followed by long numbers according to Shadow Copy ID: as mentioned above.
Of course, you can also delete all your restore points from here. Type vssadmin delete shadows /all to delete everything.
That’s it, that’s it. Let’s hope you’ve cleaned your hard drive and you may even find that your computer is working a little better now.
https://support.microsoft.com/en-us/help/555367
Expert Tip: This repair tool scans the repositories and replaces corrupt or missing files if none of these methods have worked. It works well in most cases where the problem is due to system corruption. This tool will also optimize your system to maximize performance. It can be downloaded by Clicking Here
