Updated February 2025: Stop getting error messages and slow down your system with our optimization tool. Get it now at this link
- Download and install the repair tool here.
- Let it scan your computer.
- The tool will then repair your computer.
If you’re looking for a new Outlook guide to help you edit or delete your main account, you’ve come to the right place. Each user has the freedom to add two or more accounts in the Outlook email application.

It makes sense to receive all your mail in one application, doesn’t it? However, the account added first remains the primary account. So you have a problem when migrating from one Exchange service to another.
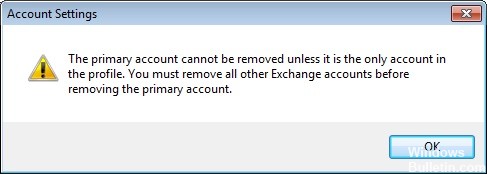
Outlook informs you that the primary account can only be deleted if it is the only account in your profile. You must delete all other Exchange accounts before you can delete the primary account. Ideally, a new data file should overwrite the old main account setting, but this will not happen.
If you are wondering how to change or delete the main account in Outlook, just follow this procedure to understand how it works.
Changing the Primary Account while Keeping the Profile
If you want to change the main account without creating a new profile, there is a better way. You can change your main account and keep your profile and profile-specific settings by adding a PST file to the profile and setting it as the default data file.

In the following steps, we will remove all Exchange accounts from your current profile, keeping the main account as the last one. Next, we will add a PST file to the profile and set it as the default file. Here are the step-by-step instructions:
- Completely close Outlook and all associated dialog boxes.
- Press the Windows + R key and enter “control mlcfg32.cpl”.
- Once you are in the Mail Configuration, click on Mail Accounts.
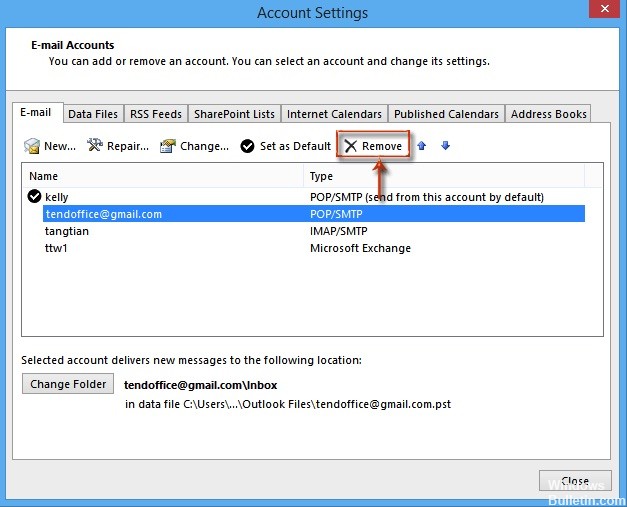
- In the account settings (“E-Mail” tab), you start deleting your Outlook accounts. Start with the secondary accounts and leave the primary account last. You can delete them by selecting an account and then clicking on Delete.
Note: The primary account is identified by the check mark on the left side of the screen. - Once all the accounts are deleted click on the Data Files tab, press Add and navigate to your PST location. Once you have loaded it, click Set as default.
Note: The default location of the PST file is in Documents / Outlook Files. - Close the Outlook settings window. Press the Windows + R key and enter “control mlcfg32.cpl” to return to the email settings. Click Email Accounts again.
Note: This step is necessary, otherwise the new account will not be listed in Outlook. - Add the new account that will be the main account by clicking on the New button. Once you have added the new account, close this window.
- Open Outlook and go to Account Settings > Account Settings and click the Data Files tab. When you get there, make sure the .OST file is set as the default. If not, select it and click the Set as Default button.
- Carry out a last restart of Outlook. Your new account should now appear as your main account.
February 2025 Update:
You can now prevent PC problems by using this tool, such as protecting you against file loss and malware. Additionally, it is a great way to optimize your computer for maximum performance. The program fixes common errors that might occur on Windows systems with ease - no need for hours of troubleshooting when you have the perfect solution at your fingertips:
- Step 1 : Download PC Repair & Optimizer Tool (Windows 10, 8, 7, XP, Vista – Microsoft Gold Certified).
- Step 2 : Click “Start Scan” to find Windows registry issues that could be causing PC problems.
- Step 3 : Click “Repair All” to fix all issues.
Adding a PST file to remove the main account

- Go to Start, then click Control Panel
- Now select the option like Show through small icons and click Mail Icon
- Now delete all secondary accounts and finally delete the primary account.
- Add the PST file to the profile and set the default
- Restart Outlook, then add a new account to the PST.
- Set the OST file that has been created as the default file for Outlook data
- Restart Outlook and delete the PST file.
- This removes the main Exchange account from Outlook if there is no PST file. This process is very complex and difficult to follow as it involves the possibility of data loss and may affect other
- Exchange accounts.
Delete the primary account by editing the registry

You can modify the registry to remove the primary mapping, but this is not supported and is not recommended by Microsoft. If you make a mistake, you must create a new profile, restore the exported profile key, or use System Restore to return to a previous restore point.
Close Outlook and open the Registry Editor.
Press Windows + R to open the Run command, type regedit in the Run field, and press Enter.
In Outlook 2016, the profile key is at :
HKEY_CURRENT_USER\Software\Microsoft\Office\16.0\Outlook\Profiles\profile-name
The profile key is included in the 2013 Outlook:
HKEY_CURRENT_USER\Software\Microsoft\Office\15.0\Outlook\Profiles\profile-name
To remove the Outlook 2010 main account from the registry, go to the profile key :
HKEY_CURRENT_USER\Software\Microsoft\Windows NT\Current Version\Windows Messaging SubSystem\Profile\profile-name
Export the profile key, then find and delete one (or both) of the registry keys associated with the master account.
https://www.quora.com/How-do-I-remove-a-primary-account-from-Outlook
Expert Tip: This repair tool scans the repositories and replaces corrupt or missing files if none of these methods have worked. It works well in most cases where the problem is due to system corruption. This tool will also optimize your system to maximize performance. It can be downloaded by Clicking Here
