Flat photographs lack the dynamic range and vibrancy that bring images to life. Fortunately, with a few tricks and techniques in GIMP, you can easily add depth and vitality to your images. GIMP is a powerful, free image-editing software that offers a diverse set of tools for photo manipulation. In this guide, we’ll explore how to enhance a flat photograph using overlays, layer masks, and other techniques to make your image pop.
Understanding Flat Images
Before diving into the manipulation process, it’s essential to understand what makes a photo appear flat. Flat images usually have low contrast, muted colors, insufficient lighting, and lack details in the shadow and highlight regions. These characteristics can make the photo appear lifeless and dull. The goal is to improve these aspects without overdoing the corrections.
Preparing Your Image
Open the photograph you want to enhance in GIMP. Ensure that you’re working on a copy of the original image to preserve the original file. Before making any changes, analyze the areas that require adjustment. Look for parts that need more contrast, color saturation, or lighting effects.
Enhancing Contrast with Layer Masks
One of the simplest ways to add depth to an image is by adjusting its contrast. A quick method to do this in GIMP is by using layer masks.
- Duplicate the background layer of your photo.
- Go to the ‘Colors’ menu and select ‘Curves.’ Adjust the curve to increase the contrast. Pay attention to the histogram to ensure you’re not losing details.
- Add a layer mask to the duplicated layer. Select ‘Black (full transparency)’ to hide the adjusted layer.
- Using a soft brush with white color, paint over the areas where you want to reveal the increased contrast.
This technique allows targeted contrast adjustments to specific image areas without affecting the entire picture.
Adding Vibrancy with Color Overlays
Flat photos can also suffer from desaturated colors. You can address this by adding a color overlay:
- Create a new layer above your background image.
- Set the overlay layer’s mode to ‘Soft Light’ to add subtle saturation.
- Choose a vibrant, dominant color from your image using the color picker tool.
- Fill the overlay layer with this color using the bucket fill tool.
- Adjust the layer’s opacity to control the intensity of the color enhancement.
Using color overlays helps in enriching the hues of your photo without altering the natural color balance significantly.
Utilizing Light Effects for Dramatic Impact
Adding light effects can instantly elevate the mood of your image. Incorporate light overlays for a dramatic effect:
- Place a light effect overlay above all layers. These are usually images of light flares, bokeh, or abstract lighting that can be found on stock photo websites.
- Change the layer’s blend mode to ‘Screen’ or ‘Addition’ to blend the light effect with your photo.
- Use the transform tools to adjust the size and position of the light effect as needed.
- If necessary, apply a layer mask to refine where the light appears on your image.
Light effects can add a focal point and guide the viewer’s eyes to the main subject of your photo.

This tutorial was converted from Giackop’s tutorial at psdtuts.com.
its been a while since I’ve done a tutorial that’s because i broke my hand and find it hard to type with only my left.
Getting Started
My outcome of the tutorial isn’t exactly the same so don’t be surprised.both images were taken by Giackop.

Castle photo: giackop.com

Clouds photo: giackop.com
Step 1
Open up the castle image ,now with the “rectangle select tool” create a selection around the van.

Now grab the Clone tool Hold CTRL on the right side of the selection then release to start cloning, try using both sides right and left of the selection , that way you get a better blended result.

Step 2
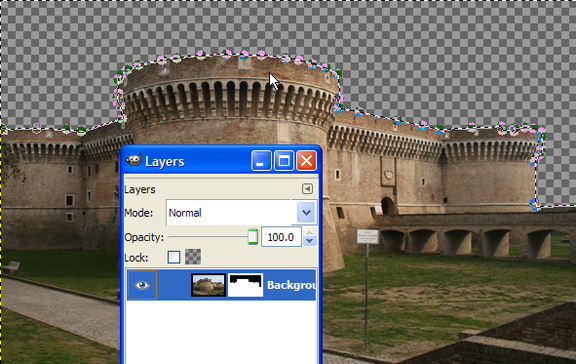
Use the “Path tool” to create a selection of the sky , when your finished adding the points around the sky hit enter to activate selection, then right click on the layer and click on “add a mask to the layer”. make sure you have “Selection” and “Invert mask “selected.


Step 3
Now insert the castle image again and place it over the original layer then desaturated by going go to colors>desaturated and then add a Gaussian blur by going to Filters>Blur>Gaussian blur 3, then set mode to “overlay”.

Step 4
Now insert the cloud image in the background by dragging the image into the canvas, to make it easer hide the other two layers by clicking the eye icon.

Step 5
Duplicate the cloud layer a set to multiply , duplicate again apply colors>desaturated then set opacity to 50% and mode to overlay

This is how the clouds should look after those steps

Step 6
Reveal all the previously hidden layers.

Step 7
Create a new layer on top of all the layers and with the brush “circle fuzzy (19)” set with colour black apply it around the lower edges

Once your done with brushing the edges set the layer to overlay

Step 8
Create a new layer grab the Blend fill set the gradient to “FG to transparent” and apply it in the centre of the image then settings to overlay mode

Step 9
for the final time insert another new castle image to the top of the layers, apply colors>desaturated then sharpen by going to filters>enhance>Sharpen 70. finally set the layer to 41% opacity and mode to overlay.
That’s it your done! i did mine several times to get what i thought was best.

Download XCF file
here is the download link to the GIMP source file Click here
Final Adjustments
To tie all your adjustments together, consider a final touch-up with GIMP’s ‘Color Balance’ or ‘Hue-Saturation’ tools. Slight tweaks can make a significant difference in the overall outcome, ensuring the image maintains a natural and cohesive look.
