Updated February 2025: Stop getting error messages and slow down your system with our optimization tool. Get it now at this link
- Download and install the repair tool here.
- Let it scan your computer.
- The tool will then repair your computer.
Hyper-V is a hypervisor (virtualization software) that allows you to run multiple operating systems on the same physical machine. Each guest operating system created using the Hyper-V platform has direct access to physical server hardware (hard disk, memory, processor, etc.). Hyper-V virtualization environment is compatible with Windows and Linux operating systems.

Perhaps the most impractical thing about Hyper-V for me and many other users is that the virtualization software does not provide direct USB support. Simply put, when running on a Hyper-V virtual machine you cannot access USB devices connected to your local PC. To solve this problem, you will either need to resort to specialized third-party tools or find a workaround for the functionality of your host operating system.
What is a Hyper-V USB Passthrough?
The USB pass-through feature allows you to access your USB device from a virtual machine. Unfortunately, USB pass-through is not initially supported in Hyper-V environments but you can still do a USB Hyper-V pass-through using the following approaches:
- Enable extended session mode
- Start the Remote Desktop Protocol (RDP) session
- Install USB network solutions
- Install USB software solutions
I will then describe how the first two approaches work, as they do not require any third-party software to be installed and can be manually configured in a few steps.
System requirements for a Hyper-V USB Passthrough
In short, to allow the virtual machine access to the local resource, you must meet the following requirements:
- Extended session mode policies and settings for extended session mode must be enabled. Extended session mode is supported only on Generation 2 virtual machines.
- To be able to connect to a virtual machine (VMConnect), your computer must be running Windows Server 2016, Windows 10, Windows 8.1, Windows Server 2012 R2 and Windows 8.
- The virtual machine to connect to a USB drive must be running Windows Server 2016, Windows Server 2012 R2, Windows 10 or Windows 8.1.
- The virtual machine you want to connect to must have Remote Desktop Services enabled.
February 2025 Update:
You can now prevent PC problems by using this tool, such as protecting you against file loss and malware. Additionally, it is a great way to optimize your computer for maximum performance. The program fixes common errors that might occur on Windows systems with ease - no need for hours of troubleshooting when you have the perfect solution at your fingertips:
- Step 1 : Download PC Repair & Optimizer Tool (Windows 10, 8, 7, XP, Vista – Microsoft Gold Certified).
- Step 2 : Click “Start Scan” to find Windows registry issues that could be causing PC problems.
- Step 3 : Click “Repair All” to fix all issues.
Remote Desktop Protocol

After installing the operating system on a virtual machine, it behaves like a physical machine. To enable connections to the remote desktop in the “System Properties” window:
After that, you can log on remotely, just like with any other Windows system.
To allow USB devices in an RDP session:
- Run mstsc.exe from the command line / start.
- Click on Show Settings:
- The dialog box is extended and includes a number of tabs. Go to the Local Resources tab and click More:
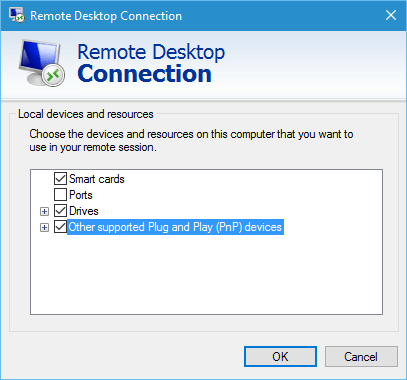
- Another dialog box will appear. Other detected devices are displayed here, as well as check boxes for other supported Plug and Play (PnP) devices. Browse the items if necessary.
After you click OK and connect to an RDP session on any host, these options will remain until you change them. There is also a useful tool called Remote Desktop Connection Manager. It is glitchy and unstable, but its ability to save many unique connection settings for remote hosts in a hierarchical tree is worth it.
Use extended session mode

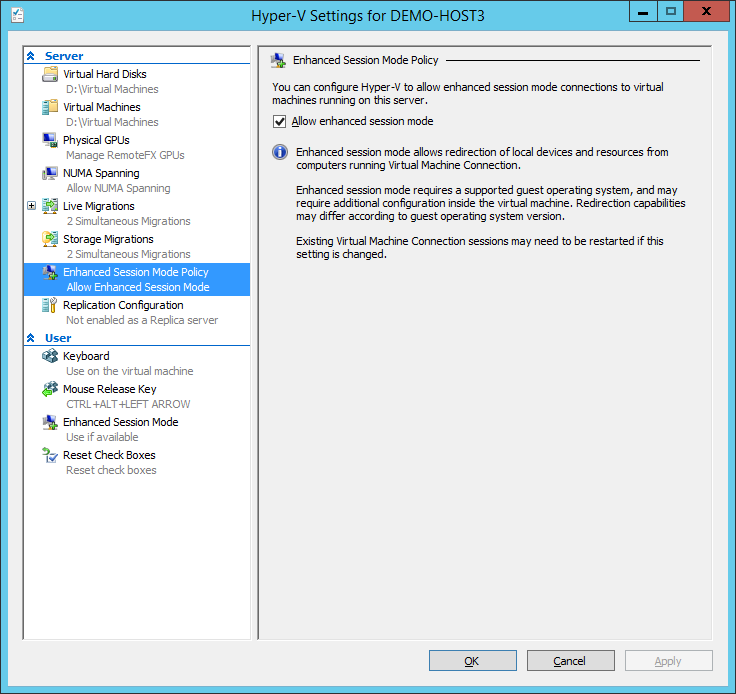
If you’re not familiar with advanced session mode, it’s mainly a feature that allows you to redirect local resources and devices to a virtual machine. If your system is running Windows 10 or Windows 8.1, this mode is already enabled by default. If your Hyper-V host is running Windows Server 2012 or Windows Server 2016, you will need to activate it manually.
Follow the instructions below to run the USB relay:
- First open the Hyper-V Manager on your Hyper-V host.
- From there, right-click on the virtual machine you want to use and select “Hyper-V Options” from the drop down menu.
- In the Servers and Users sections, go to the Advanced Session Mode Policy tab and activate the Allow Advanced Session Mode option.
- Then click Apply, and then click OK to save your changes.
- You now need to select the local resources that you want to use. This includes local drives, printers, USB devices, etc. Д.
- To do this, start the virtual machine in the Hyper-V Manager window by double-clicking its name.
- A configuration window will appear before logging on. Click the option Show parameters in this window to display additional parameters.
- Click the Local Resources tab and click the Advanced button.
- In order for the virtual machine to access the local USB device, you must enable the option “Other supported Plug and Play devices”. Then click the OK button.
- To save these settings for future use, you can check the Save my settings for future connections to this virtual machine checkbox.
- Finally, click “Connect” to connect to the virtual machine.
Expert Tip: This repair tool scans the repositories and replaces corrupt or missing files if none of these methods have worked. It works well in most cases where the problem is due to system corruption. This tool will also optimize your system to maximize performance. It can be downloaded by Clicking Here
