This tutorial is designed for those new to web 2.0 text logo creation, as well as for those with some experience. We’ll proceed step by step, covering each detail thoroughly, so be prepared for a comprehensive and straightforward guide. You’ll learn various techniques applicable to more than just text logos. Among the techniques we’ll cover are:
- Creating a mirrored reflection of the text logo using a Mask layer.
- Generating a glossy look using the Ellipse Selection tool in subtract mode.
- Creating smooth edges with the Grow Selection feature.
Here’s what you’ll be able to create by the end of this tutorial:

For this tutorial, I’m using the Gimp 2.4 candidate version. If there are any version-specific features, I’ll point them out as we go.
Step 1
Start by opening a new 420×300 image. Select the Text Tool from the Tools Dialog, choose a font, and type a word. Rename this layer to “Main text”.
Step 2
In the layer dialog, activate the “lock alpha channel” option.
* In version 2.2, you’ll find this slightly to the right.

Step 3
Now, select the “Web 2.0 Grey Blue 3D” Gradient from the pre-made web 2.0 Gradient pack, available here. If you don’t have it, I’ll guide you through creating it.
Step 4
If you haven’t downloaded the Gradient pack, skip this step. Create a new gradient by clicking “New Gradient”.

Name it “Web 2.0 Grey Blue 3D” or something memorable. Click the left triangle and add color 6291c0 for the “Left Endpoint”. Then click the right triangle, adding cce6f9 for the “Right Endpoint”. Adjust the middle triangle as shown in the image below, then save.
Step 5
With the gradient color ready, select the “Blend tool”. In the Gradient Dialog, choose the “Web 2.0 Grey Blue 3D” gradient and apply it beneath the text, dragging from bottom to top.

Here’s the expected result:

Step 6
To create smooth outlines, right-click on the “main text” layer and choose “Alpha to Selection”.

Step 7
Navigate to Select>Grow to open the “Grow Selection” dialog, or right-click on the Text and select Select then Grow. Increase the selection by 3px.

Create a new layer named “Border” and fill it with the dark blue color 293a47 using the “Bucket Fill Tool”. Position it behind the “Main Text” layer to serve as a border.
Step 8
Duplicate both the “Main Text” and “Border” layers, then merge them to create the reflection effect.

Step 9
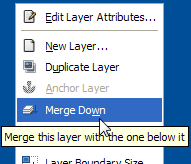
Merge the two duplicated layers by right-clicking on “Main Text#1” and selecting “Merge Down”. Rename the merged layer to “Reflection”.

Step 10
Clear any selection with Select>None. Use the “Move Tool” to position the reflection below the original logo. Flip it vertically using the “Flip Tool”.
Step 11
Right-click on the “Reflection” layer, select “Add Layer Mask”, and choose “Black Full Transparency”.
Step 12
Use the Blend tool with the “FG to BG (RGB)” Gradient to apply it to the reflection.

The result should look like this:

Step 13
We’re almost done! Now let’s add the glassy effect.
Step 14
With the “Ellipse Selection” Tool in “Subtract mode”, select the lower part of the “Main Text” logo and create a new layer named “Glassy effect”.

Step 15
Finish by applying white color with the “Bucket Fill Tool” to the selected area.
Step 16
Finally, adjust the layer opacity to 30.5.
And that’s it! You should now have a logo similar to the example:

Share your results in our showcase forum section. Feel free to ask for help or provide feedback. Your input helps us create more great tutorials!
Note: The XCF source file is available for download at the bottom.
=============

