Create a fantasy image with the Gimp. In this tutorial, we will be taking a picture of a baby iguana and another picture of a bat and we will combine them to be a full-fledged dragon. This tutorial is based off of a Photoshop tutorial from PSDTuts by Alvaro Guzman. I’ve made another tutorial before like this one, but for some odd reason it disappeared off the face of the earth and I haven’t been able to find it. Anyway, let’s get started!
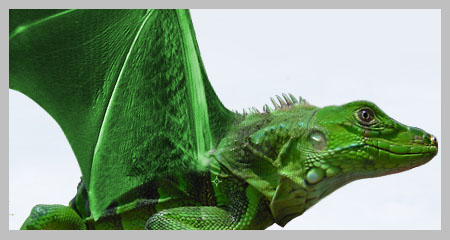
Here is what we will be making. You can click it to view it full size.

Step 1
First, we need to collect some stock photos. Head on over to Stock.xchng and grab this photo of a castle.Create a new canvas that is no smaller than 1440×900 pixels. We want something rather large to work with so that we have plenty of room to mess around. Open the image of the castle as a new layer onto the canvas. Name the new layer “castle.” Get out the eyedropper tool and select a sample color of the sky.
Create a new transparent layer below the castle layer. Fill the layerwith color #EAEFF5. Merge the castle layer with this layer. Use the clone stamp tool and get rid of the ugly little line left over. Renamethe layer “castle.”

Step 2
Now we will add in the main part of our dragon. Head on over to here and download the image of the iguana.
Open it as a new layer on our canvas. Rename the layer to “iguana.”
Make the image smaller (if needed) and move it above the castle.

Step 3
Select the iguana layer and bring down its opacity to about 52%. Resize the picture while trying to fit the iguana’s legs over the castle.
Afterward, extract the iguana from the background. You can do this multiple ways. I recommend using the paths tool.

Step 4
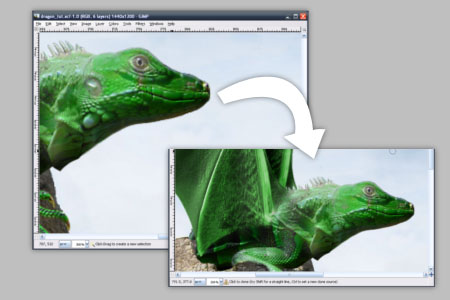
Now let’s cut off that gizzard looking thing and smooth out the soon-to-be dragon’s face. Get out the paths tool, lasso tool, whatever you use to render. Cut off the gizzard. After you have done that, locate the Select tool and make a rectangular selection around the iguana’s head. Go to Filters > Distort > Iwarp. Use the move function with the settings listed in the picture. Shape the iguana’s head similar to what I have done. It’ll take some work, but play around with brush sizes, etc and you will get it.

Step 5
The Iwarp has made our image a bit blurry, so get out the sharpen tool and lightly sharpen some of the areas around the nose.

Step 6
Now we will add our wings.Go ahead and download this photo of a bat and open it as a new layer on your canvas.Go ahead and extract the wing from the background. Be sure to leave a little of the bat’s body attached as well as we will be needing it.

Step 7
Next we will place the wing on the dragon. While doing this, I realized that I needed more room at the top so that the wing would fit in without being cut off. To fix this, Go to Image > Canvas Size.
Deactivate the little chain image so that proportions ARE NOT
constrained. Enlarge the height from 900 pixels to about 1200. Drag the
image on the bottom of the dialog to the bottom of the box and click ok.
Select the castle layer and go to Layer > Boundary to Image Size. Do the same with the background layer. Select the castle layer. Get out the eyedropper tool and pick a color from the edge of the top of the sky. Fill in the background layer with this color. Merge this layer and the castle layer. Run the clone stamp tool over the sky to give it a few clouds. Select the wing layer and go to Layer > Transform > Flip Horizontal.

Step 8
Now we will finally add in the wing. Using a combination of the scale tool, rotate tool, and the select tool, position the wing over the dragon like I have below. Right click the wing layer and add a layer mask. Choose full opacity. Use a black brush on the layer mask to
“erase” some of the extra wing.

Step 9
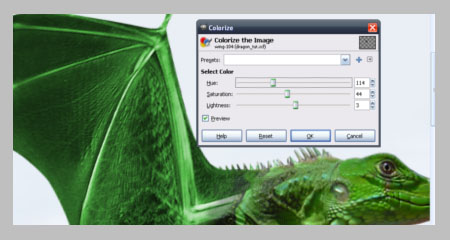
Now let’s change the wing’s hue by going to Colors > Colorize. Use 114 for the hue, 44 for the saturation, and 3 for the lightness. Click ok.

Step 10
Next, use a combination of small white or black brushes on the layer mask to attach the wing to the body even more so.

Step 11
Duplicate the wing layer and place it behind all other layers with the exception being the castle/background layer. Scale the wing to make it a tiny bit smaller. Rotate it a tiny bit if necessary.

Step 12
Now we need to get rid of that extra bones showing on the second wing. Use the clone tool to do this.

Step 13
Burn the inside of the second wing a little with the burn tool. Select the lizard’s layer and go to Colors > Hue/Saturation. Make the dragon’s green match that of the green on the wings. Merge the dragon and wing layers. Rename the layer “dragon.” Move the dragon down onto the castle a little more.

Step 14
Let’s sharpen up the hands. Get out the sharpen tool and run it over the front hand.

Step 15
Now for an important step. Get out the lasso tool and copy a big portion of the top of the castle where the dragon is. Paste it over the dragon. Name this new layer “top castle.” Use the Magic Wand tool to select the sky that is still covering the dragon. Go to Select > Feather. Feather the selection by 2 pixels. Delete. Now use the eraser
tool to erase some of the parts of the castle that are covering the dragon. Try to create a natural effect.

Step 16
We need to inflate the dragon’s hand a little bit. Take the rectangular
selection tool and select around the hand. Go to Filters > Iwarp. Set the Deform Mode to Grow. Set the brush radius to 31 and the deform amount to 0.07. Be sure the bilinear box is checked. Apply the brush to the hand and click ok.

Step 17
Now the lighting on our dragon doesn’t exactly match the castle’s lighting. Let’s fix it. Duplicate the dragon layer twice. Rename the one layer “dragon light” and rename another layer “dragon dark.” Rename the third layer “dragon normal.” Hide the dragon dark layer and the dragon normal layer and select the dragon light layer. Go to Colors > Levels. Make the layer lighter. Click ok and unhide the dragon dark layer while hiding the dragon light layer. Go to Colors > Levels and make it darker. Click ok. Unhide all the hiding layers. Put the light dragon layer on top, the dark dragon layer in the middle, and the normal dragon layer underneath that. Give the dark and light dragon layers transparent layer masks like before.

Step 18
Get out a soft white brush tool. Paint on the light dragon layer mask. Paint the left areas of the dragon according to the light source (see the castle’s shadows for reference). Change brush sizes anytime you want. If you make a mistake while painting, CTRL-Z, or just paint with a black brush over the mistake.

Step 19
Now do the same on the dragon dark layer. Paint in the shaded areas.

Step 20
Grab the burn tool and darken and burn pieces of both the castle and
top castle layers. Pay attention to the areas where the dragon actually
touches the castle.

Step 21
Now we will add a dramatic style to the sky. Get out the magic wand tool and select the sky on the castle layer (hold shift and select the sea as well). Create a new layer above the castle layer and name it “clouds1.” Set the foreground color to black (#000000) and the background color to gray (#A8A8A8). Go to Filters > Render > Clouds > Solid Noise. Set the detail to 5 and click ok. Set the blending mode to Burn. Add transparent a layer mask to the cloud1 layer. Add a white to black gradient to the mask from top to bottom. Deselect.

Step 22
Let’s fix some imperfections on the dragon’s face. We need to get rid of the big white circles on his face, so get out the clone tool and remove them.

Step 23
Create a new layer above all the other layers and name it “clouds2”. Go to Filters > Render > Clouds > Solid Noise. Set the detail to 20 and hit ok. Change the blending mode to Overlay. Lower the opacityto 85%.

Step 24
Go to Edit > Copy Visible and then go to Edit > Paste. Be sure to press the new layer button to form a new layer with what was pasted (as we have before). Go to Filters > Blur > Guassian Blur. Blur by 5 pixels and hit ok. Change the blending mode to Overlay and click ok. Lower the opacity to 35%..

Step 25
I went ahead and duplicated the overlayed layer twice to give more of a shadowy effect. Now let’s add some adjustment layers and then we will be done! Go to Layer > New From Visible. Go to Colors > Color Balance. For the shadows option, use 47, 16, and -51. For the midtones option, use 66, 15, and -69. For the highlights option, use 20, 0, and -38. Click ok. Set the layer mode to Multiply. Duplicate the layer. Set this layer to Normal and lower the opacity to 60%.

Conclusion
And there you have it, a fantasy dragon created in Gimp. Go ahead and try using this method to create other fantasy creatures as well! As always, I’d love to see some of your own results, so I encourage you to post them in the comments section below.

