Updated April 2024: Stop getting error messages and slow down your system with our optimization tool. Get it now at this link
- Download and install the repair tool here.
- Let it scan your computer.
- The tool will then repair your computer.
When creating training presentations, especially technical ones, you often need to include screenshots (static screen images) and screenshots (videos showing the activity on the screen). In PowerPoint 2010 and later versions, you can create screenshots from PowerPoint.
PowerPoint 2016 has introduced the ability to take screenshots, and this feature has also been added in PowerPoint 2013. When you have all your updates, you should see them.
The process is a little complicated, so I will describe how to take a screenshot and a PowerPoint screenshot.
Instructions for saving the screen in PowerPoint
PowerPoint comes with an integrated and discreet paperless recorder. There are many things that a PowerPoint paperless recorder cannot do with a full paperless recorder software, but that’s the beauty of it – it’s great for quick and easy recording.
April 2024 Update:
You can now prevent PC problems by using this tool, such as protecting you against file loss and malware. Additionally, it is a great way to optimize your computer for maximum performance. The program fixes common errors that might occur on Windows systems with ease - no need for hours of troubleshooting when you have the perfect solution at your fingertips:
- Step 1 : Download PC Repair & Optimizer Tool (Windows 10, 8, 7, XP, Vista – Microsoft Gold Certified).
- Step 2 : Click “Start Scan” to find Windows registry issues that could be causing PC problems.
- Step 3 : Click “Repair All” to fix all issues.
- To record audio with your recording on the screen, you need a microphone, an audio card and speakers on your computer. The speakers allow you to hear the recorded material.
- To save the screen in PowerPoint, click on the Insert tab and click on Screen recording in the Media button group to open a pop-up window.
- Click the Select Area button in the pop-up window to select the area to save.
- The mouse pointer changes to a “crosshair”.
- Click on the screen in the area you want to be the upper left corner of the area to be registered, and drag the mouse pointer over the area that will be the lower right corner of the area to be registered.
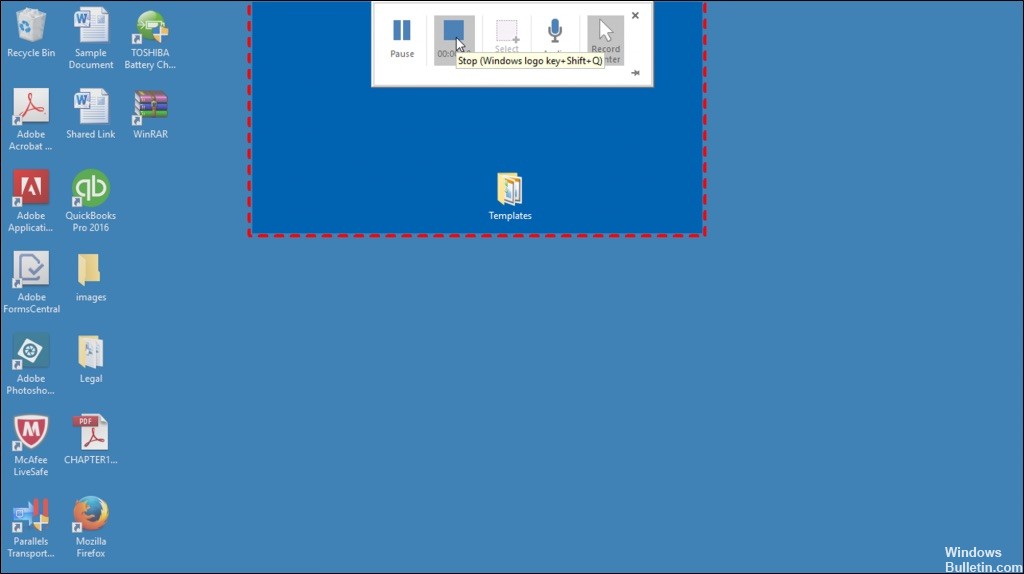
- A dotted rectangle indicates the area to be recorded. Everything inside the contour is recorded.
- To disable the Audio and Recording Pointer controls, click on them to disable them. PowerPoint automatically activates these commands when you configure a recording on the screen.
- Open the program, video or what you want to record.
- To start recording, click the Save button in the pop-up window. It’s the button with the red circle.
- You will receive a three-second countdown before the recording begins.
- To stop recording, click the Stop button in the pop-up window or press the Windows + Shift + Shift + Shift + Q key on your keyboard.
- Your screenshot will appear as a new object on the current slide.
- To save your screenshot, right-click on the object and select “Save media as…” from the context menu.
- In the dialog box that opens, navigate to the location where you want to save the file.
- In the Name field, enter a name for the file and click Save to save the screenshot.
- You can now manipulate the object like any other object.

CONCLUSION
If you are looking for an easy way to make a quick screenshot or screenshot on your computer, you can’t look for anything else in PowerPoint. Yes, that’s right! Microsoft’s presentation creation software actually has a screen recording function hidden in its tools.
This feature works on Mac and PC with Microsoft PowerPoint 2016 and updated versions from 2013 onwards.
Expert Tip: This repair tool scans the repositories and replaces corrupt or missing files if none of these methods have worked. It works well in most cases where the problem is due to system corruption. This tool will also optimize your system to maximize performance. It can be downloaded by Clicking Here
