Updated April 2024: Stop getting error messages and slow down your system with our optimization tool. Get it now at this link
- Download and install the repair tool here.
- Let it scan your computer.
- The tool will then repair your computer.
Microsoft states that “certain applications must have access to your account information in order to work properly”. In most cases, this simply means that applications are allowed to use your account name, account image, and other information about you to provide personalized interaction with Windows.
Some applications want to see information related to your Microsoft account. When you sign in to a new website or app with your Facebook accounts, you share certain information associated with that account with the app or website.
To disable access to your account information in Windows 10, follow these steps.
- Open the Settings app.
- Go to Privacy – Account information.
- On the right, under Allow access to your account information on this device, click the Edit button.
- In the next dialog box, turn off the switch.
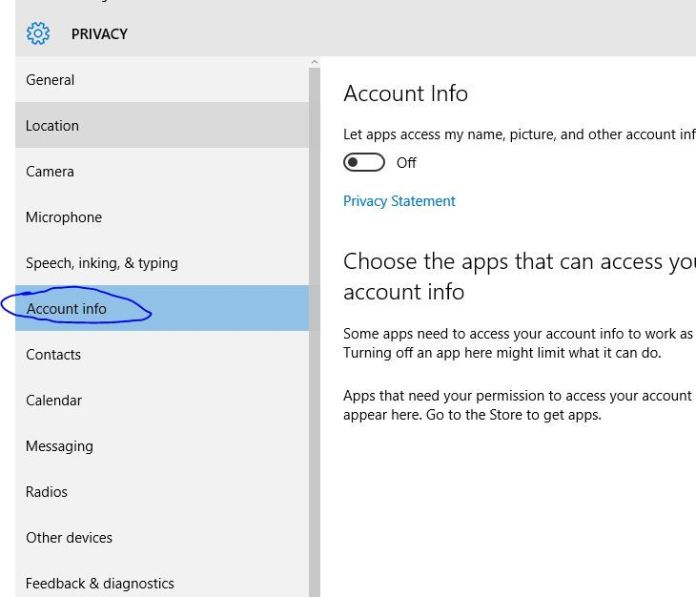
This will disable access to your account information in Windows 10 for the operating system and applications. Windows 10 can no longer use it. None of the installed applications can process this information.
In this case, you can use the switches to enable or disable any application to access your account information as needed. If you don’t want applications to be able to access this data, use the main switch above (under Allow applications to access my name, photo, and other account information) to disable this feature.
April 2024 Update:
You can now prevent PC problems by using this tool, such as protecting you against file loss and malware. Additionally, it is a great way to optimize your computer for maximum performance. The program fixes common errors that might occur on Windows systems with ease - no need for hours of troubleshooting when you have the perfect solution at your fingertips:
- Step 1 : Download PC Repair & Optimizer Tool (Windows 10, 8, 7, XP, Vista – Microsoft Gold Certified).
- Step 2 : Click “Start Scan” to find Windows registry issues that could be causing PC problems.
- Step 3 : Click “Repair All” to fix all issues.
Use the Microsoft Privacy Bar
Microsoft has developed an excellent little-known web tool called Privacy Dashboard, which allows you to track and delete most of the information that Microsoft collects about you. To access it, go to https://account.microsoft.com/privacy/.
As described earlier in this story, here you can disable advertising targeting and delete the data collected by Kortana. You can also view and delete your browsing history, search history, location information, voice activity, media activity, LinkedIn activity, and more. Д.
(Please note that your browsing and search history is only saved if you use Microsoft Edge or Internet Explorer. No data is saved if you use other browsers, such as Chrome or Firefox. In addition, your location history is only recorded when they do so on Microsoft devices, not on iOS or Android devices).
Its use is very simple. Just go to the information you want to view and delete, then click “View and delete … You can view all your actions in this category and delete individual instances (for example, one web search) or all at once.
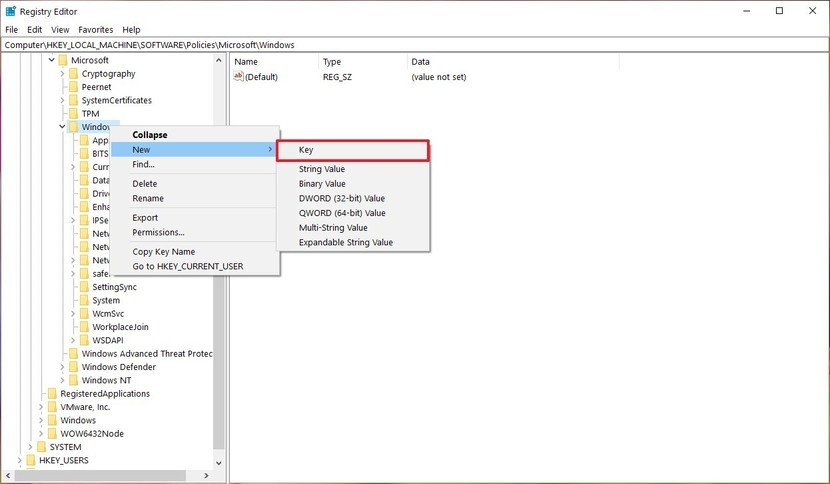
Disable access to account information for applications through the Registry editor
Just in case, you can use the export feature to back up the registry. To see how each value works in this option, follow these steps:
- Open the Run dialog box by holding down the Windows key and pressing the R key. Then type “regedit” in the field and press Enter to open the registry editor. Select “Yes” in response to the query “Control user accounts”.
- In the Registry Editor, proceed to the next section. If the key is missing, just create it like this:
- HKEY_LOCAL_MACHINE \ Software \ Policies \ Microsoft \ Windows \ AppPrivacy
- Right click on the right pane, select “Create”> “DWORD” (32-bit value) and call it “LetAppsAccessAccountInfo”. Double click on it and change the data value to 2.
- Note: this value is considered the default value for all applications. These values are 0 for the user who has control, 1 to allow the enforcement action and 2 to prohibit the enforcement action.
- If you want to use all three options, as in the Local Group Policy editor. You can create three different values for different options. Right-click on the right pane and select “Create” > “Multi-line value”.
- Name the user “LetAppsAccessAccountInfo_UserInControlOfTheseApps” as the control value. The Force Force Force name is “LetAppsAccessAccountInfo_ForceAllowTheseApps”. Name the forced failure as “LetAppsAccessAccountInfo_ForceDenyTheseApps”.
- You can now open any value and place the package family names (PFNs) there. This will apply this particular parameter to that particular application. Once configured, be sure to restart the system for the changes to take effect.
- Note. The PFNs added to the screenshot are only intended to give you an idea of what they will look like.
Expert Tip: This repair tool scans the repositories and replaces corrupt or missing files if none of these methods have worked. It works well in most cases where the problem is due to system corruption. This tool will also optimize your system to maximize performance. It can be downloaded by Clicking Here
