Updated April 2024: Stop getting error messages and slow down your system with our optimization tool. Get it now at this link
- Download and install the repair tool here.
- Let it scan your computer.
- The tool will then repair your computer.
On Windows 10, there can be many reasons to change the name of an account. For example, while many people find it convenient to reveal their name on the login screen, some users may consider this a privacy issue, especially if they use their device in a public place. You recently changed your name and want to see the new information. Or you are using a local account and want to see your full name instead of your account name.
Whatever the reason, you can change the name that appears on the login screen when you try to access your Windows 10 account. However, this is not a simple process and you will need to follow different instructions depending on whether you are using a Microsoft account or a local account.
In this Windows 10 guide, we’ll show you the different ways you can change the account name that appears on the sign-in screen for accounts associated with a Microsoft account or a local account.
How to Rename a Windows 10 Local User Account
- In the search box, type: User Accounts and press Enter or select the User Accounts option from the results at the top of the list.
- This will open the User Accounts section in the Classic Control Panel and select Manage another account from there.
- Then select the user account you want to rename.
- In the next section you will have several options to manage the account. In this case you want to select the first option – change the account name.
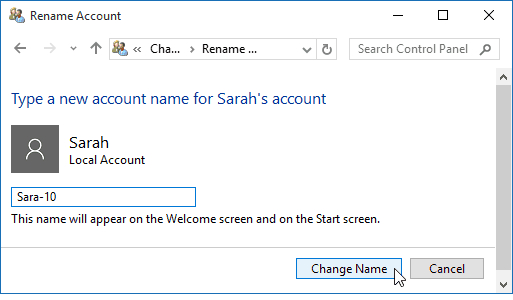
- Now type the new name you want to give to the account and click the Change Name button.
- That’s all you can do! The account will be renamed, and you will see this reflected in the Manage other accounts section and in the login screen.
April 2024 Update:
You can now prevent PC problems by using this tool, such as protecting you against file loss and malware. Additionally, it is a great way to optimize your computer for maximum performance. The program fixes common errors that might occur on Windows systems with ease - no need for hours of troubleshooting when you have the perfect solution at your fingertips:
- Step 1 : Download PC Repair & Optimizer Tool (Windows 10, 8, 7, XP, Vista – Microsoft Gold Certified).
- Step 2 : Click “Start Scan” to find Windows registry issues that could be causing PC problems.
- Step 3 : Click “Repair All” to fix all issues.
Microsoft is starting to move away from the Control Panel and move much of your PC’s configuration to the new Settings application. But the Control Panel is still there for now. This may change over time as Windows 10 matures. When that happens, we’ll update this process.
Change the account name to Local Users and Groups
- Open Run by Windows+R, type lusrmgr.msc, and click OK to open Local Users and Groups.
- Open the Users folder, right-click on a user and choose Rename from the menu.
- Type a new name in the name field.
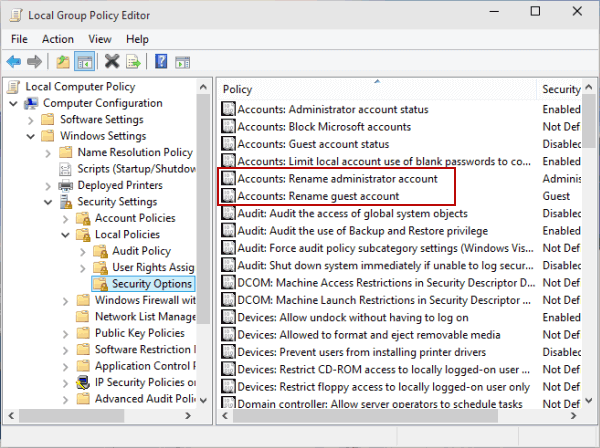
Change the name of the administrator or guest in the Local Groups Policy Editor
- Go to the Local Group Policy Editor.
- Open Computer Configuration/Window Settings/Security Settings/Local Policies/Security Options/Accounts : Rename the administrator’s account (or accounts : Rename Guest account).
- Type a new name and click OK.
Expert Tip: This repair tool scans the repositories and replaces corrupt or missing files if none of these methods have worked. It works well in most cases where the problem is due to system corruption. This tool will also optimize your system to maximize performance. It can be downloaded by Clicking Here
