Updated April 2024: Stop getting error messages and slow down your system with our optimization tool. Get it now at this link
- Download and install the repair tool here.
- Let it scan your computer.
- The tool will then repair your computer.
In this article, we will discuss registry values in Windows Vista that deal with system recovery and how you can adjust disk space allocation and recovery point creation frequency. Windows typically uses up to 15% of a drive’s available disk space to back up recovery points. On Windows XP, the option to change this number was configurable from the System Restore tab in the System Properties dialog box. Unfortunately, this option is no longer available under Windows Vista.
System restore options
April 2024 Update:
You can now prevent PC problems by using this tool, such as protecting you against file loss and malware. Additionally, it is a great way to optimize your computer for maximum performance. The program fixes common errors that might occur on Windows systems with ease - no need for hours of troubleshooting when you have the perfect solution at your fingertips:
- Step 1 : Download PC Repair & Optimizer Tool (Windows 10, 8, 7, XP, Vista – Microsoft Gold Certified).
- Step 2 : Click “Start Scan” to find Windows registry issues that could be causing PC problems.
- Step 3 : Click “Repair All” to fix all issues.
To do this, open the registry editor and change some values. Microsoft MSDN describes registry values as follows:
DiskPercent: The maximum amount of disk space on each disk that can be used by System Restore. This value is expressed as a percentage of the total disk space. The default value is 12%. Windows Vista receives a value from the Volume Shadow Copy Service (VSS). This is the maximum amount of disk space on each disk that can be used by system recovery. The default value is 15% of total disk space or 30% of available free space, whichever is less.
RPGlobalIntervalData : The absolute time interval in seconds in which the planned system control points are created. The default value is 86 400 (24 hours). Windows Vista receives a value from the system recovery task scheduler. Zero if the task is disabled.
RPLifeIntervalData : The time interval during which recovery points are kept in seconds. If a restore point becomes older than the specified interval, it is deleted. The default age limit is 90 days.
RPSessionIntervalData : The time interval in seconds during which scheduled system control points are created during the session. The default value is zero, which means that the function is disabled. Windows Vista gets zero when system recovery is disabled.
To start, first create a system restore point, then type regedit in the boot search and press Enter. Navigate to the next button:
HKLMSOFTWAREMicrosoftWindowsNTCurrentVersion SystemRestoreCfg
Double-click DiskPercent.
The default value is f (hexadecimal), which is 15 decimal. For the indication of 10% type a.
The frequency at which you want your system restore points to be created automatically can also be configured as follows. Navigate to the next button:
HKLMSOFTWAREMicrosoftWindowsNTCurrentVersionSystemRestore
You can change the default value RPGlobalInterval from 86 400 seconds (24 hours) to 43200 (a8c0) if you want every 12 hours.
When your new restore points are created, the oldest ones are deleted on a FIFO or First In First Out basis for space reasons.
In Windows Vista, SystemRestore is configured by default to remove restore points after about 4,294,967,295 seconds or 136 years, which was only 90 days under XP. The idea is obviously to delete it only if it is absolutely necessary for reasons of space.
If you wish, you can also change this interval. Change the value of RPLifeInterval in the same key ; a setting of 7,776,000 seconds (or 76a700 in hexadecimal) corresponds to 90 days.
System restore point storage space
To find out how much space is used for restore points in your Windows Vista, simply follow these steps :
vssadmin sha list sha Download
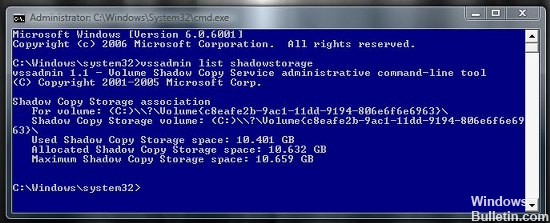
And if you want to change the disk space for system recovery, you can use the vssadmin command line tool from the command prompt.
Suppose you want to change the size of the shadow space on disk C to, for example, 5 GB. Then type the following command into the cmd and press Ctrl+Shift+Enter together. This will execute it as administrator :
vssadmin resize shadowstorage /For=C : /On=C : size=5GB
After finishing the job, you receive a message :
Successful resizing of the cache shortcut
To restore the original values, simply disable and enable system recovery.
To start system restore, type rstrui in the Windows search bar and press Enter. To access the System Properties dialog box with the SystemRestore options, you can press the’Windows Logo + BREAK Button’.
Windows 7 users should consult our Freeware System Restore Manager. This is a portable utility that allows you to fully manage and customize the recovery points on your Windows system. You can even use this utility to select a drive and change the maximum amount of disk space to use, system recovery, system recovery interval, and so on.
To create system restore points during operation, try Quick Restore Maker. With this tool, you can create system restore points with a single click.
Expert Tip: This repair tool scans the repositories and replaces corrupt or missing files if none of these methods have worked. It works well in most cases where the problem is due to system corruption. This tool will also optimize your system to maximize performance. It can be downloaded by Clicking Here
